Managing Inventory & Warehouse Settings
Managing inventory and warehouse settings is an essential part of product management in Afosto. Here you will find a detailed explanation of how to do this.
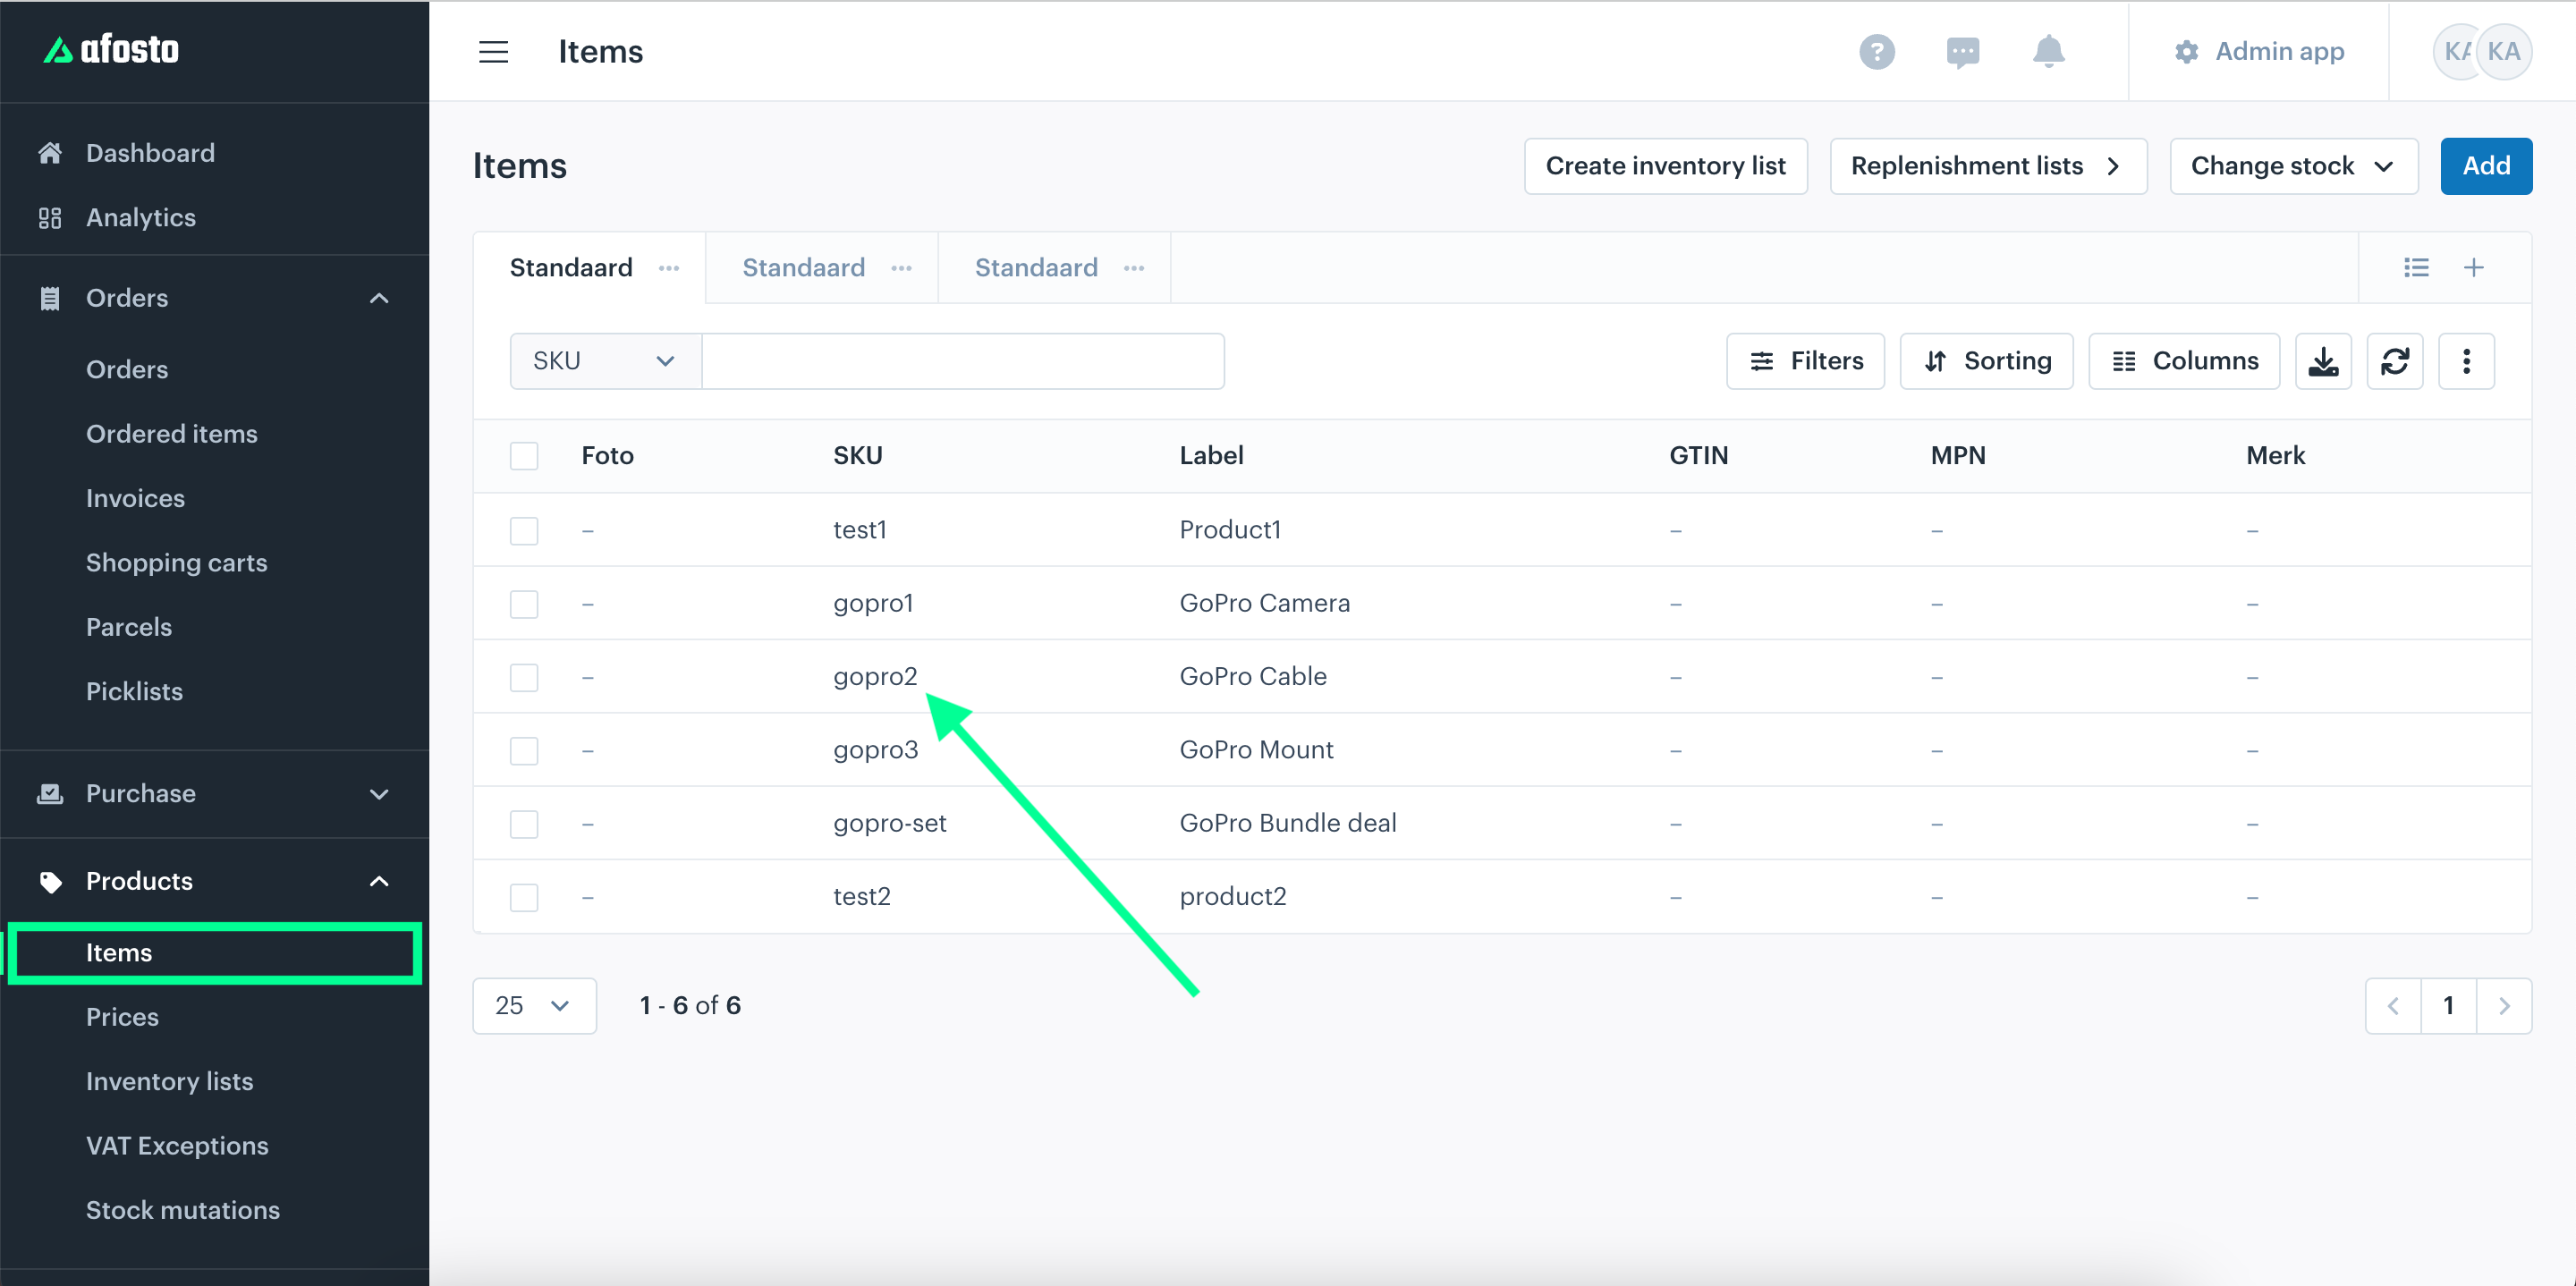
How to start
- Start by clicking on the 'Products' tab.
- Then, click on 'Items'. This will take you to the page with all your products.
On the Products page, click on the product for which you want to add inventory or adjust warehouse settings.

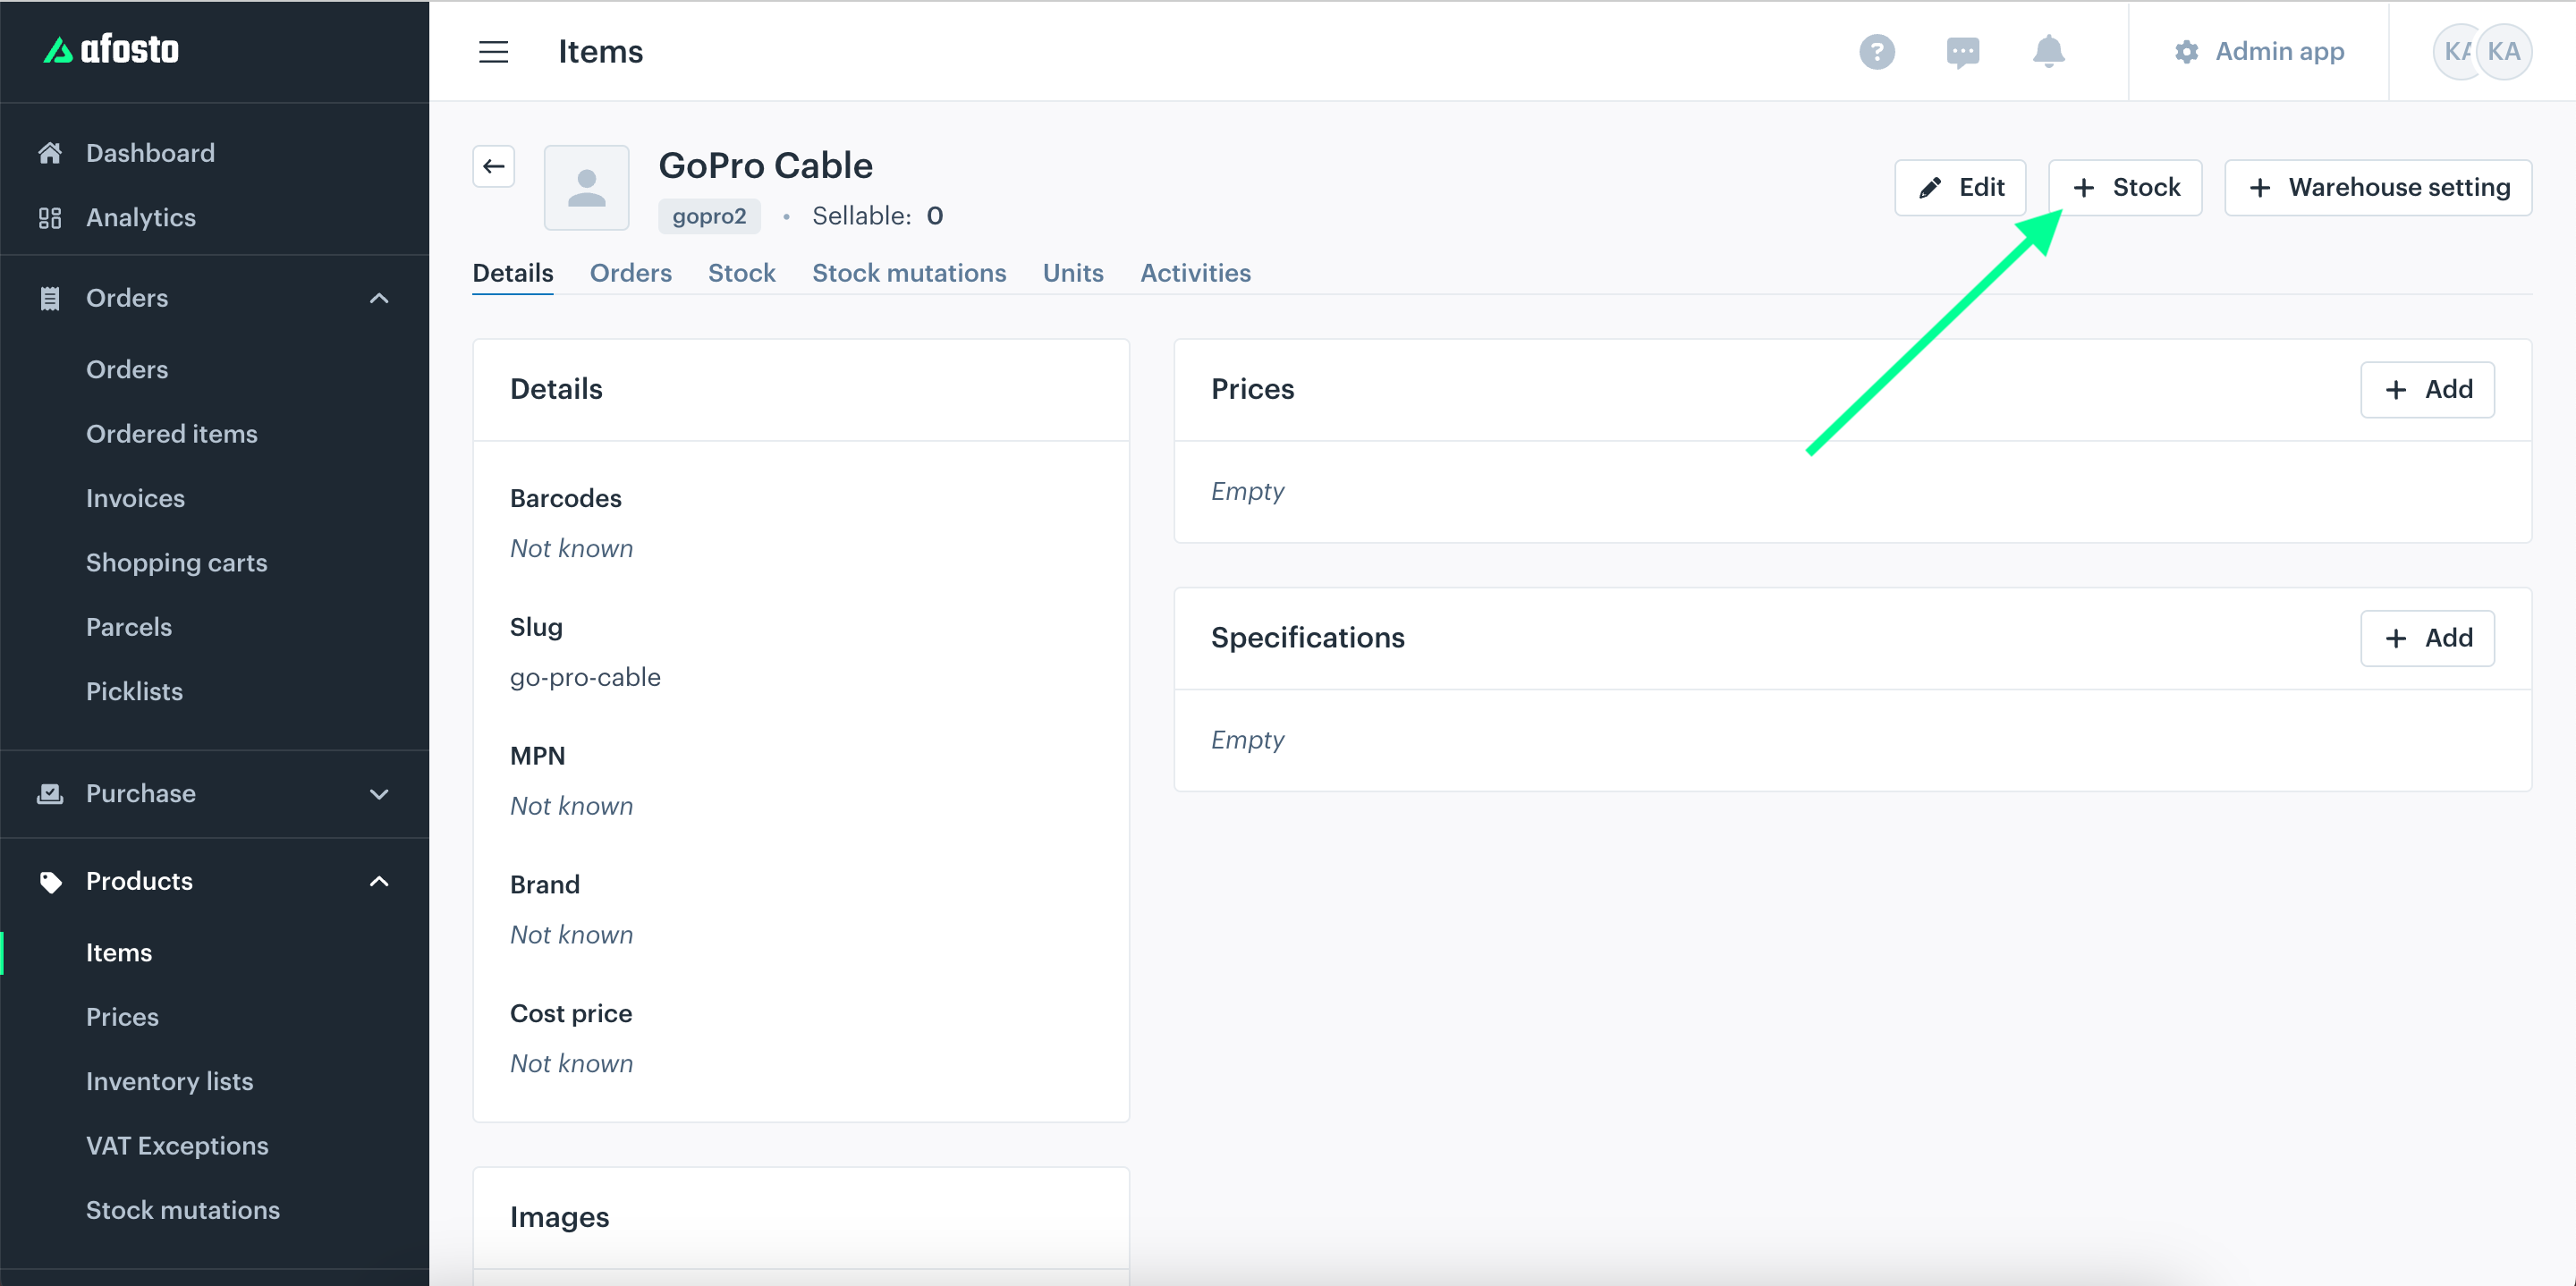
How to add stock
- To add stock, click on the product you want. This opens a window with the product details.
- Click the '+ Stock' button at the top right of the screen.
A window will open where you can:
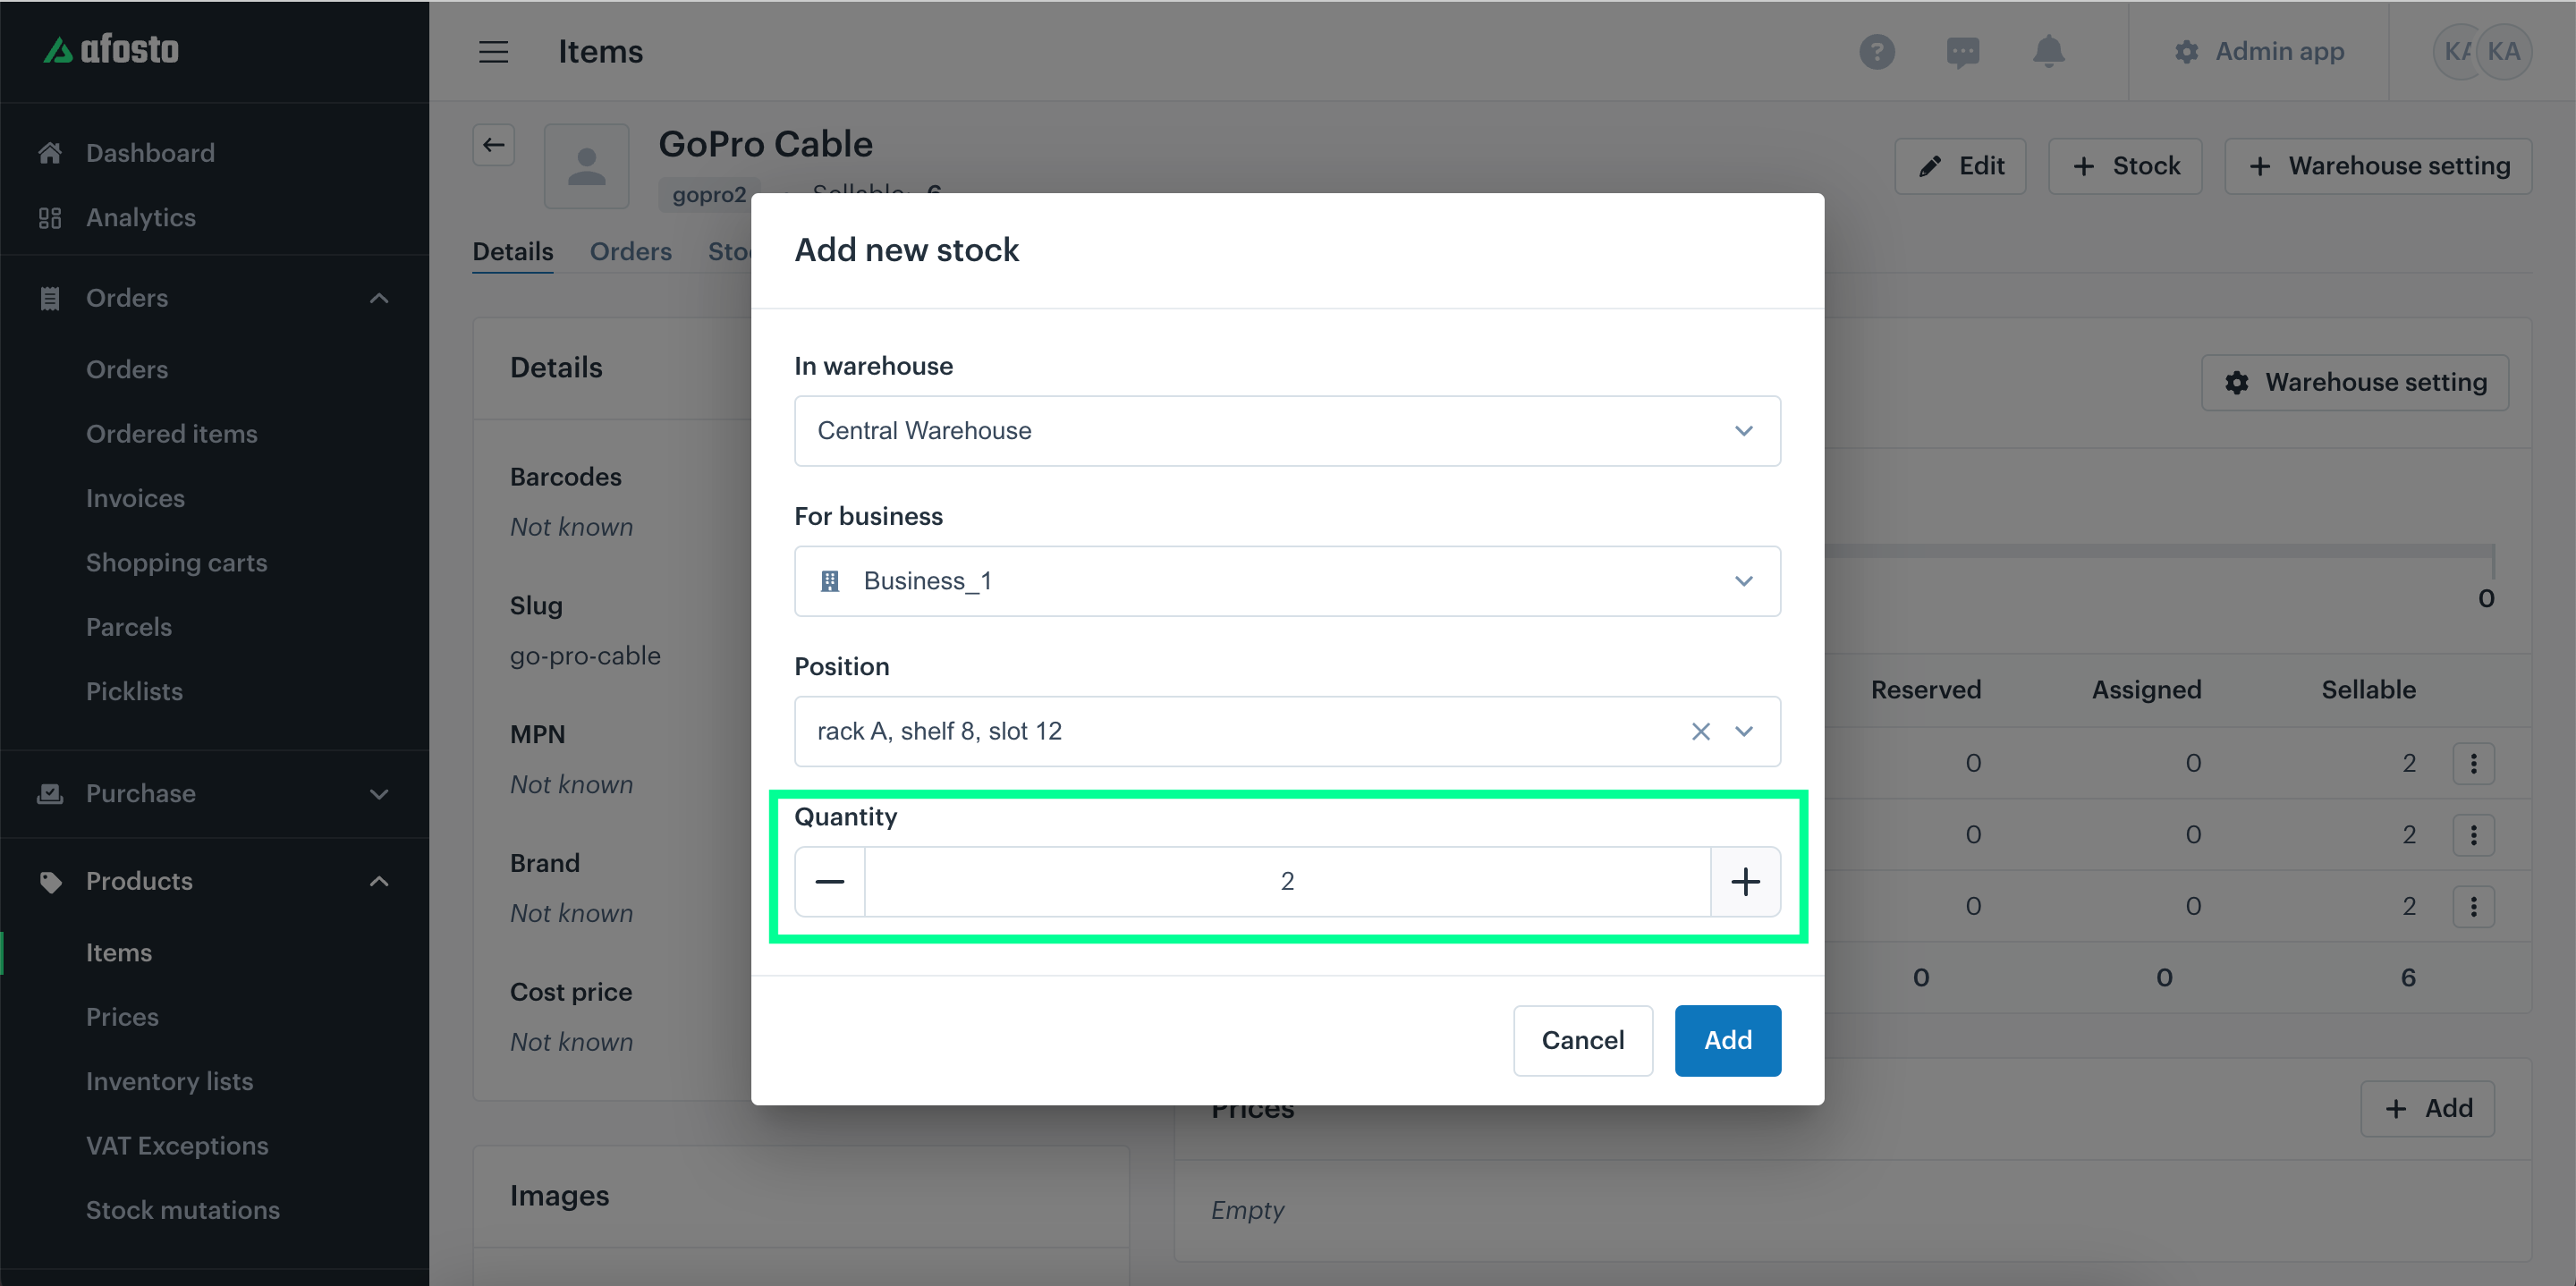
Choose warehouse
In the 'In Warehouse' field, select the warehouse where you want to add the inventory. This could be your physical store or a warehouse at another location. This helps you track where your inventory is located. If you haven't added a warehouse to your account yet, you can add one here. For more details on adding a warehouse, check out the Warehouses documentation.
Specify company
In the 'For Company' field, specify which company the inventory belongs to if you have multiple companies linked to your Afosto account. This indicates which of your businesses owns this inventory.
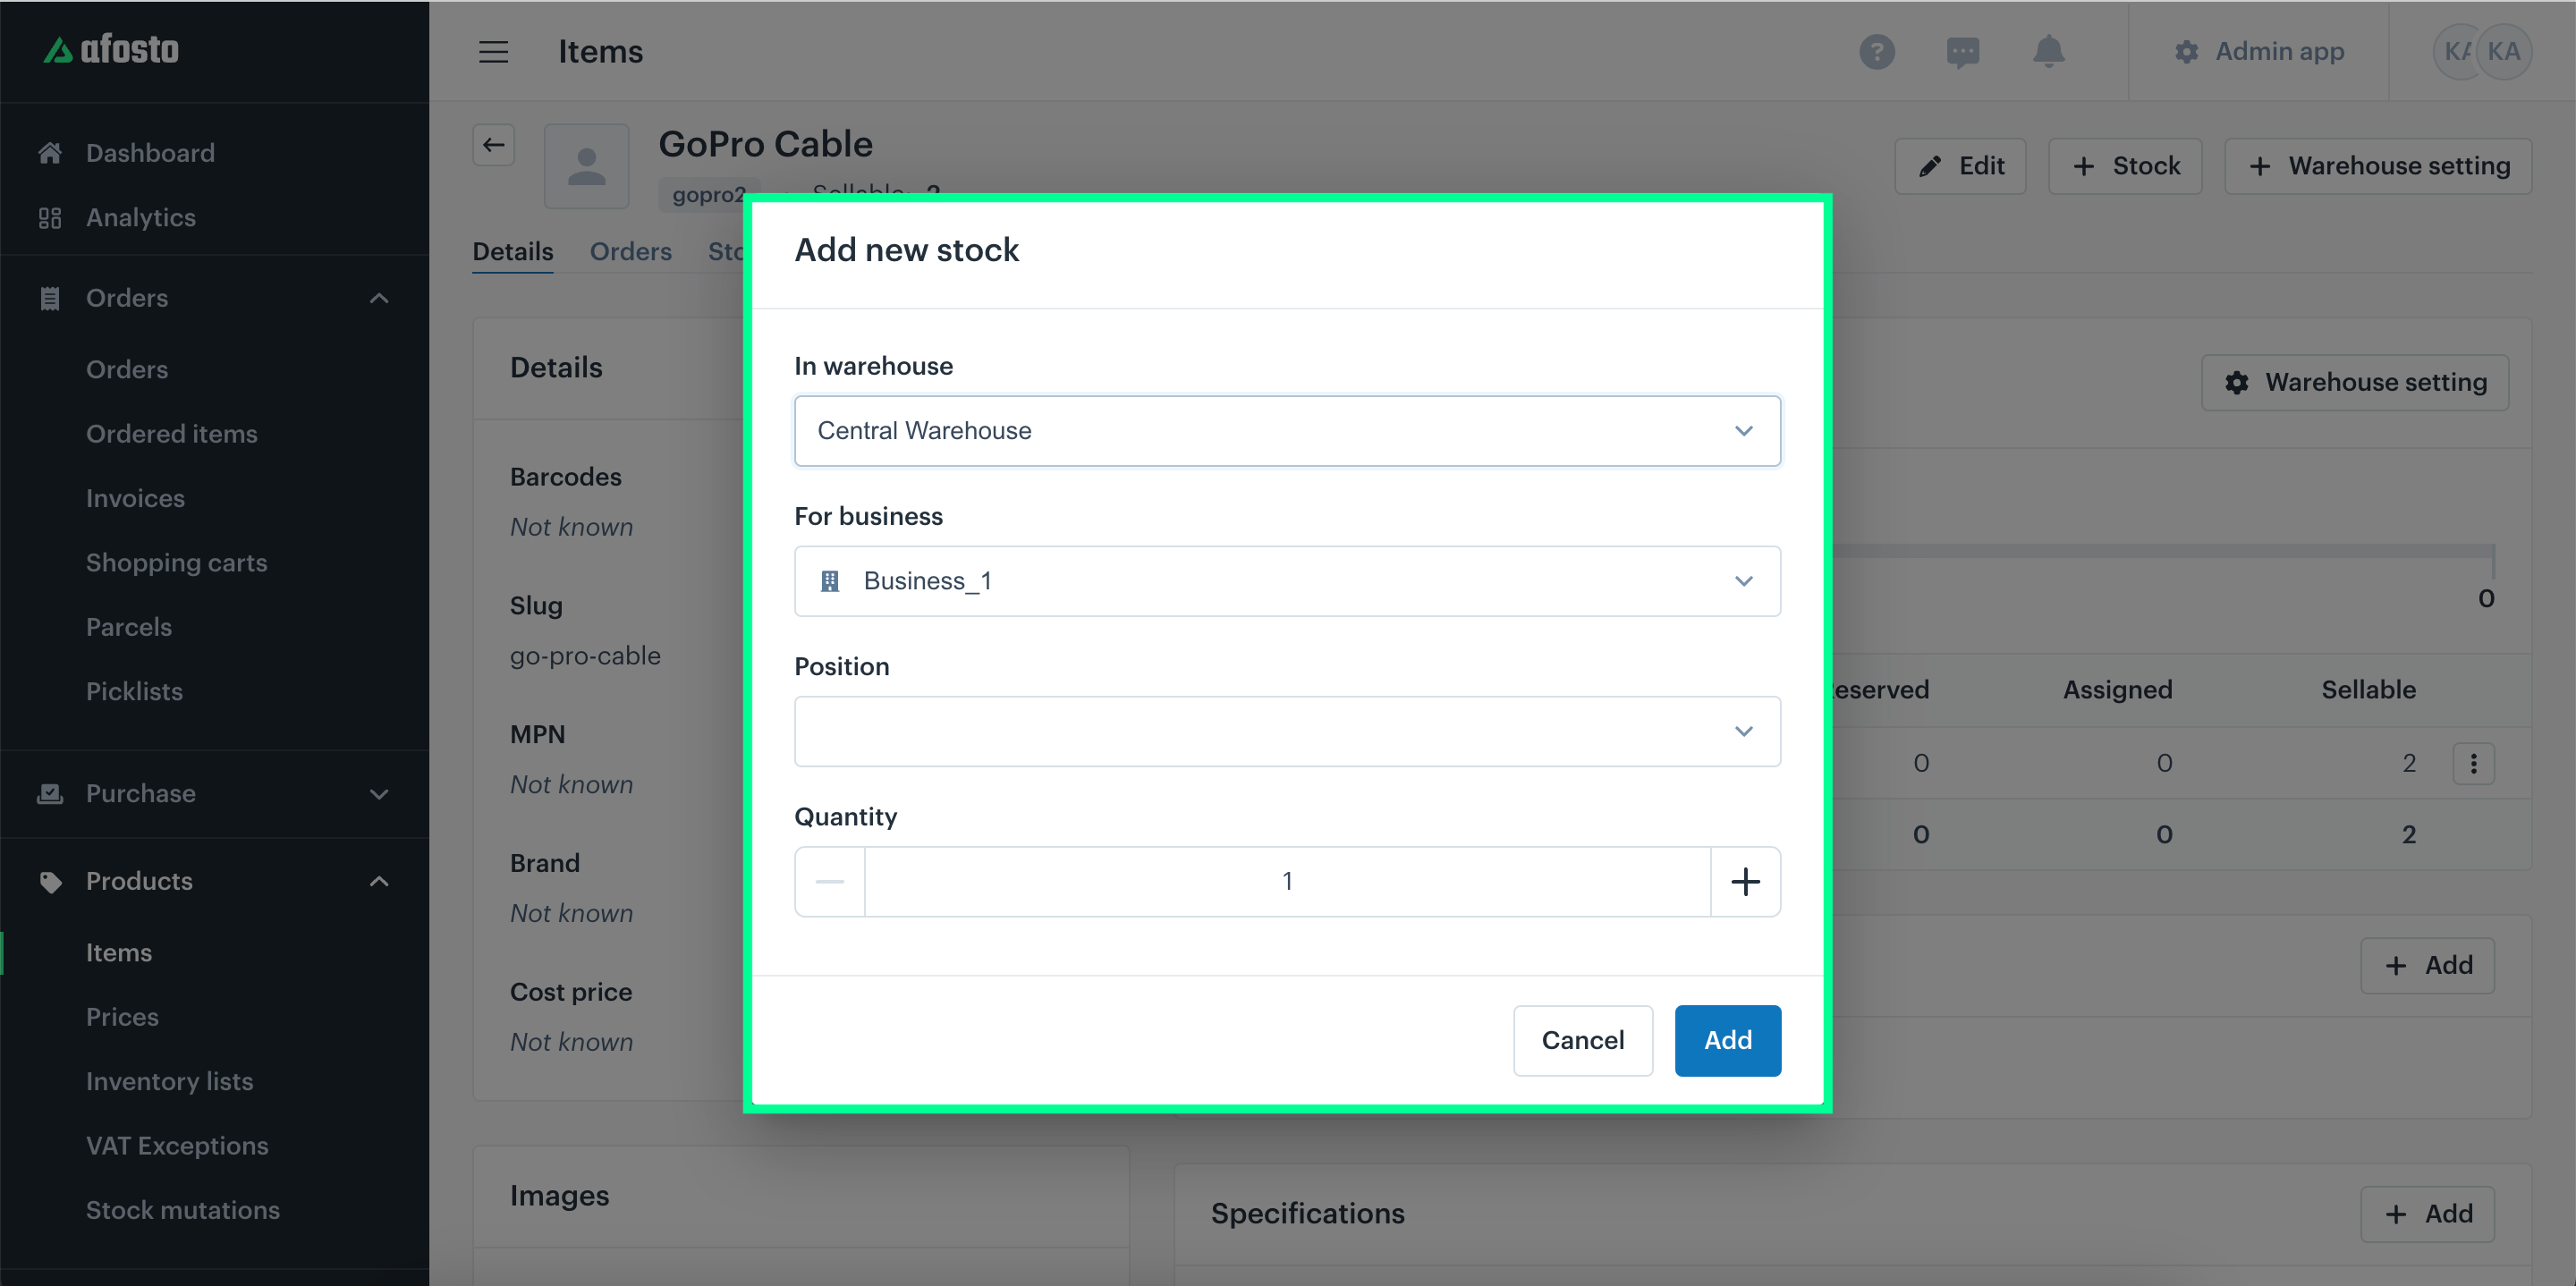
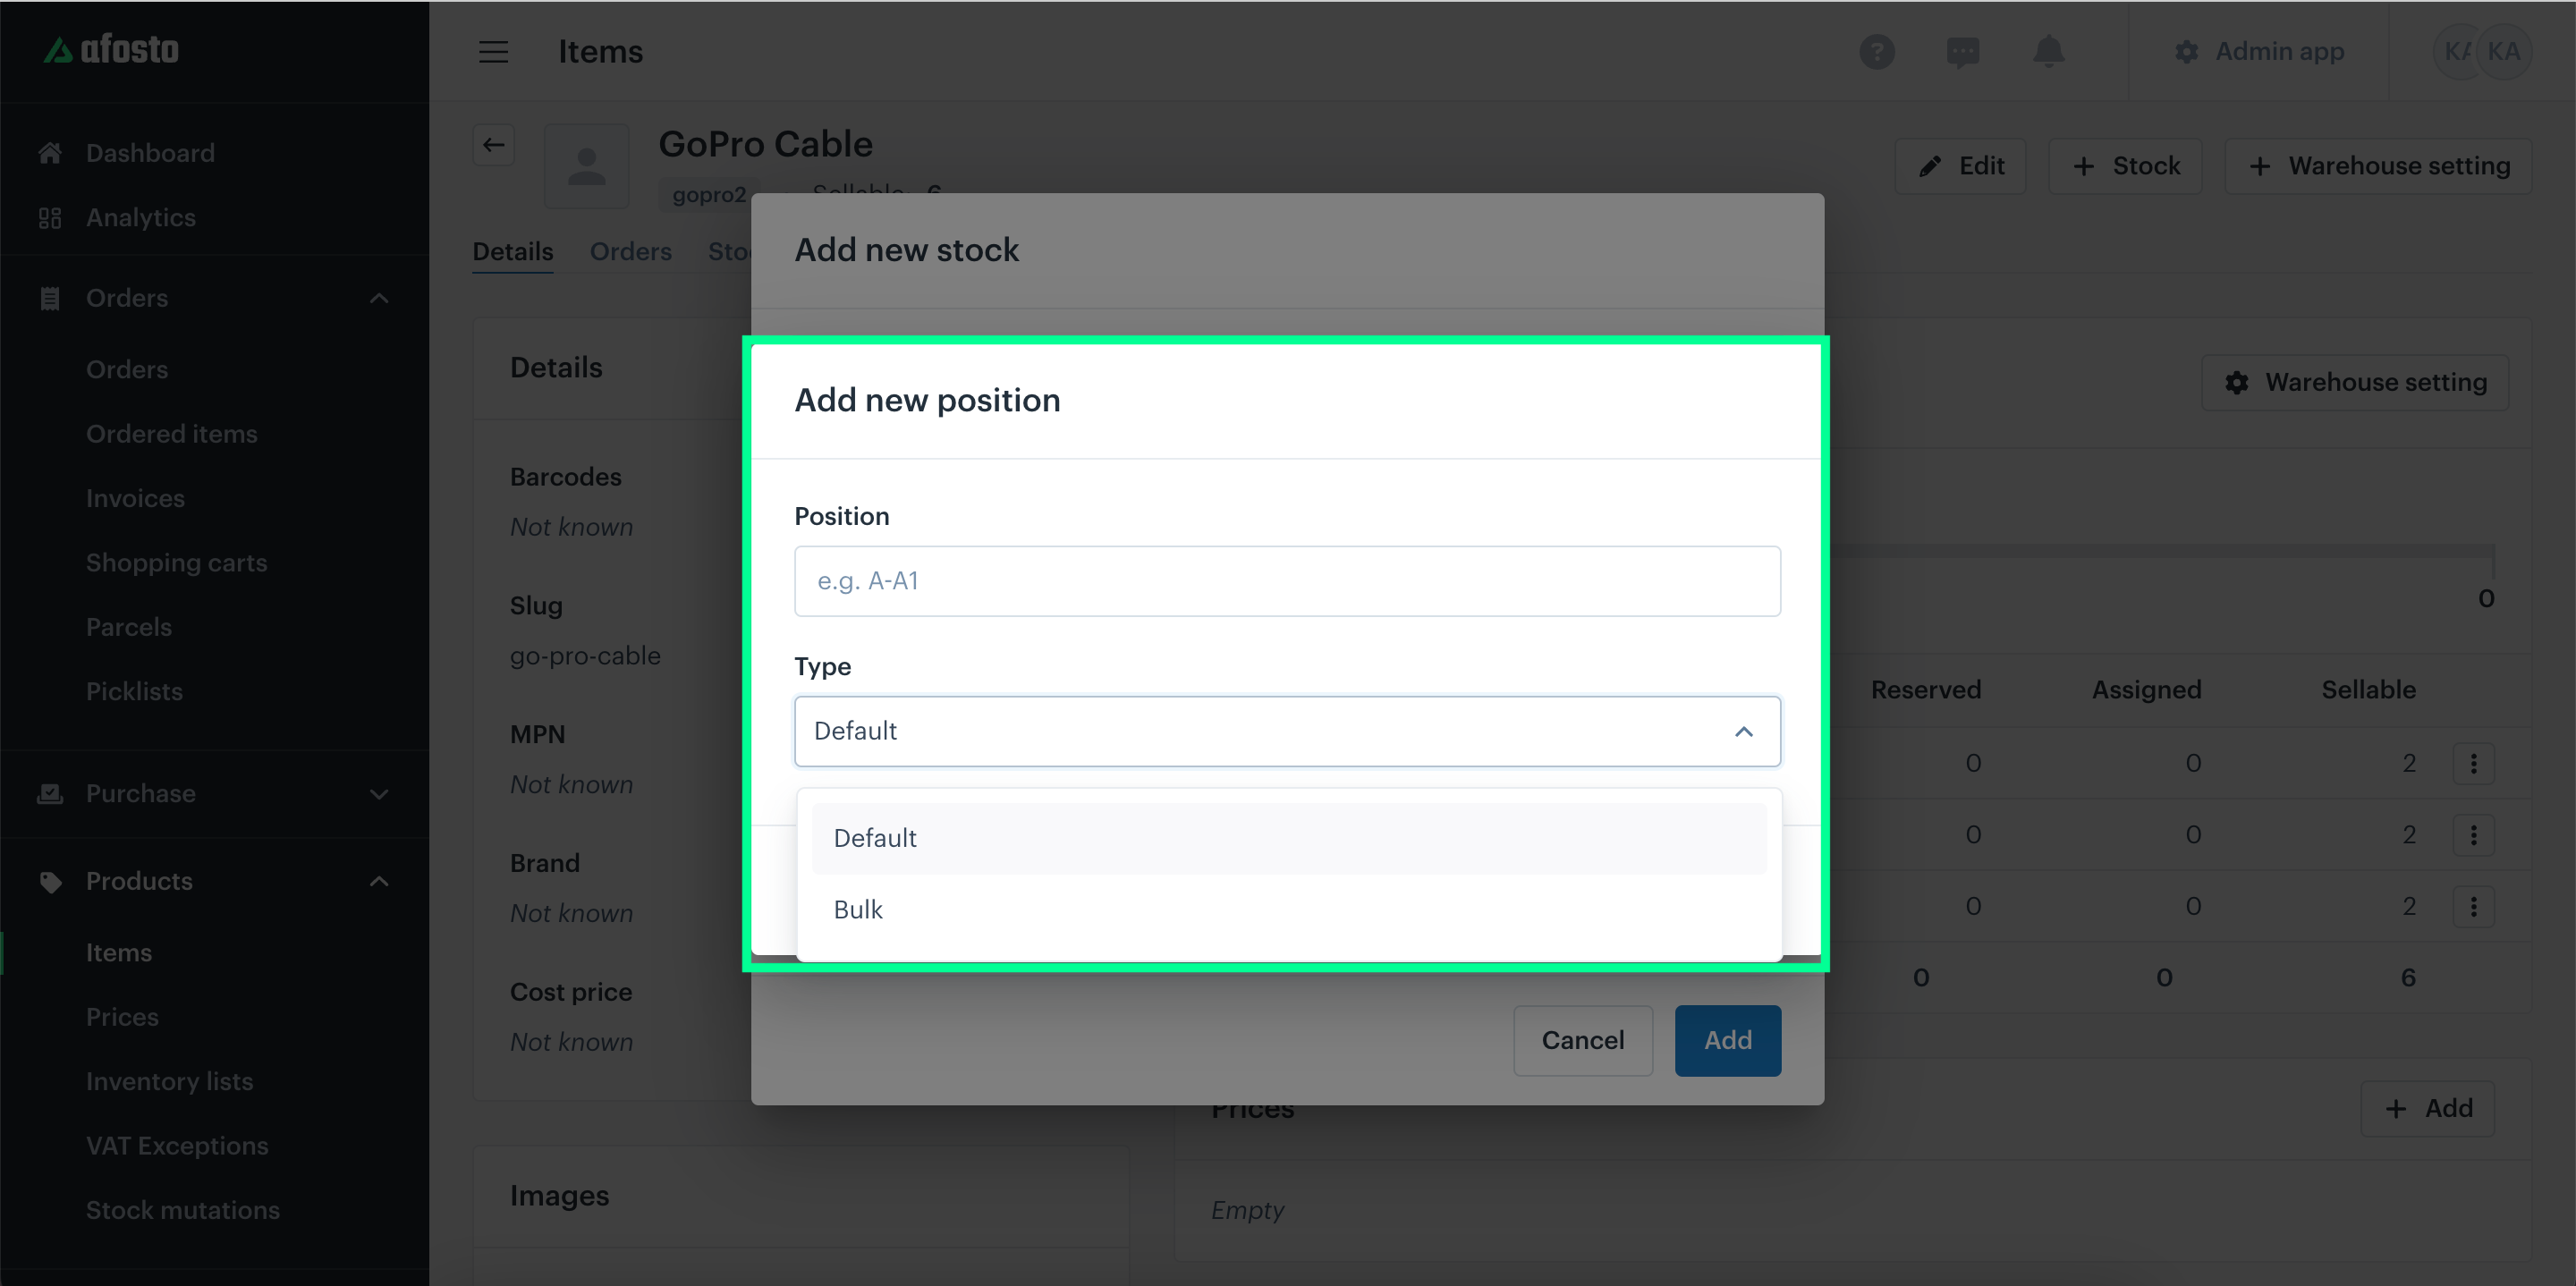
Stock position
Use the 'Position' field to specify the location of the product in your warehouse, for example, Rack A, Shelf 8, Slot 12. If you haven't established positions yet, you can add them by clicking 'Add New Position'. These positions help identify where the stock is located, which is useful for picking lists and individual orders.
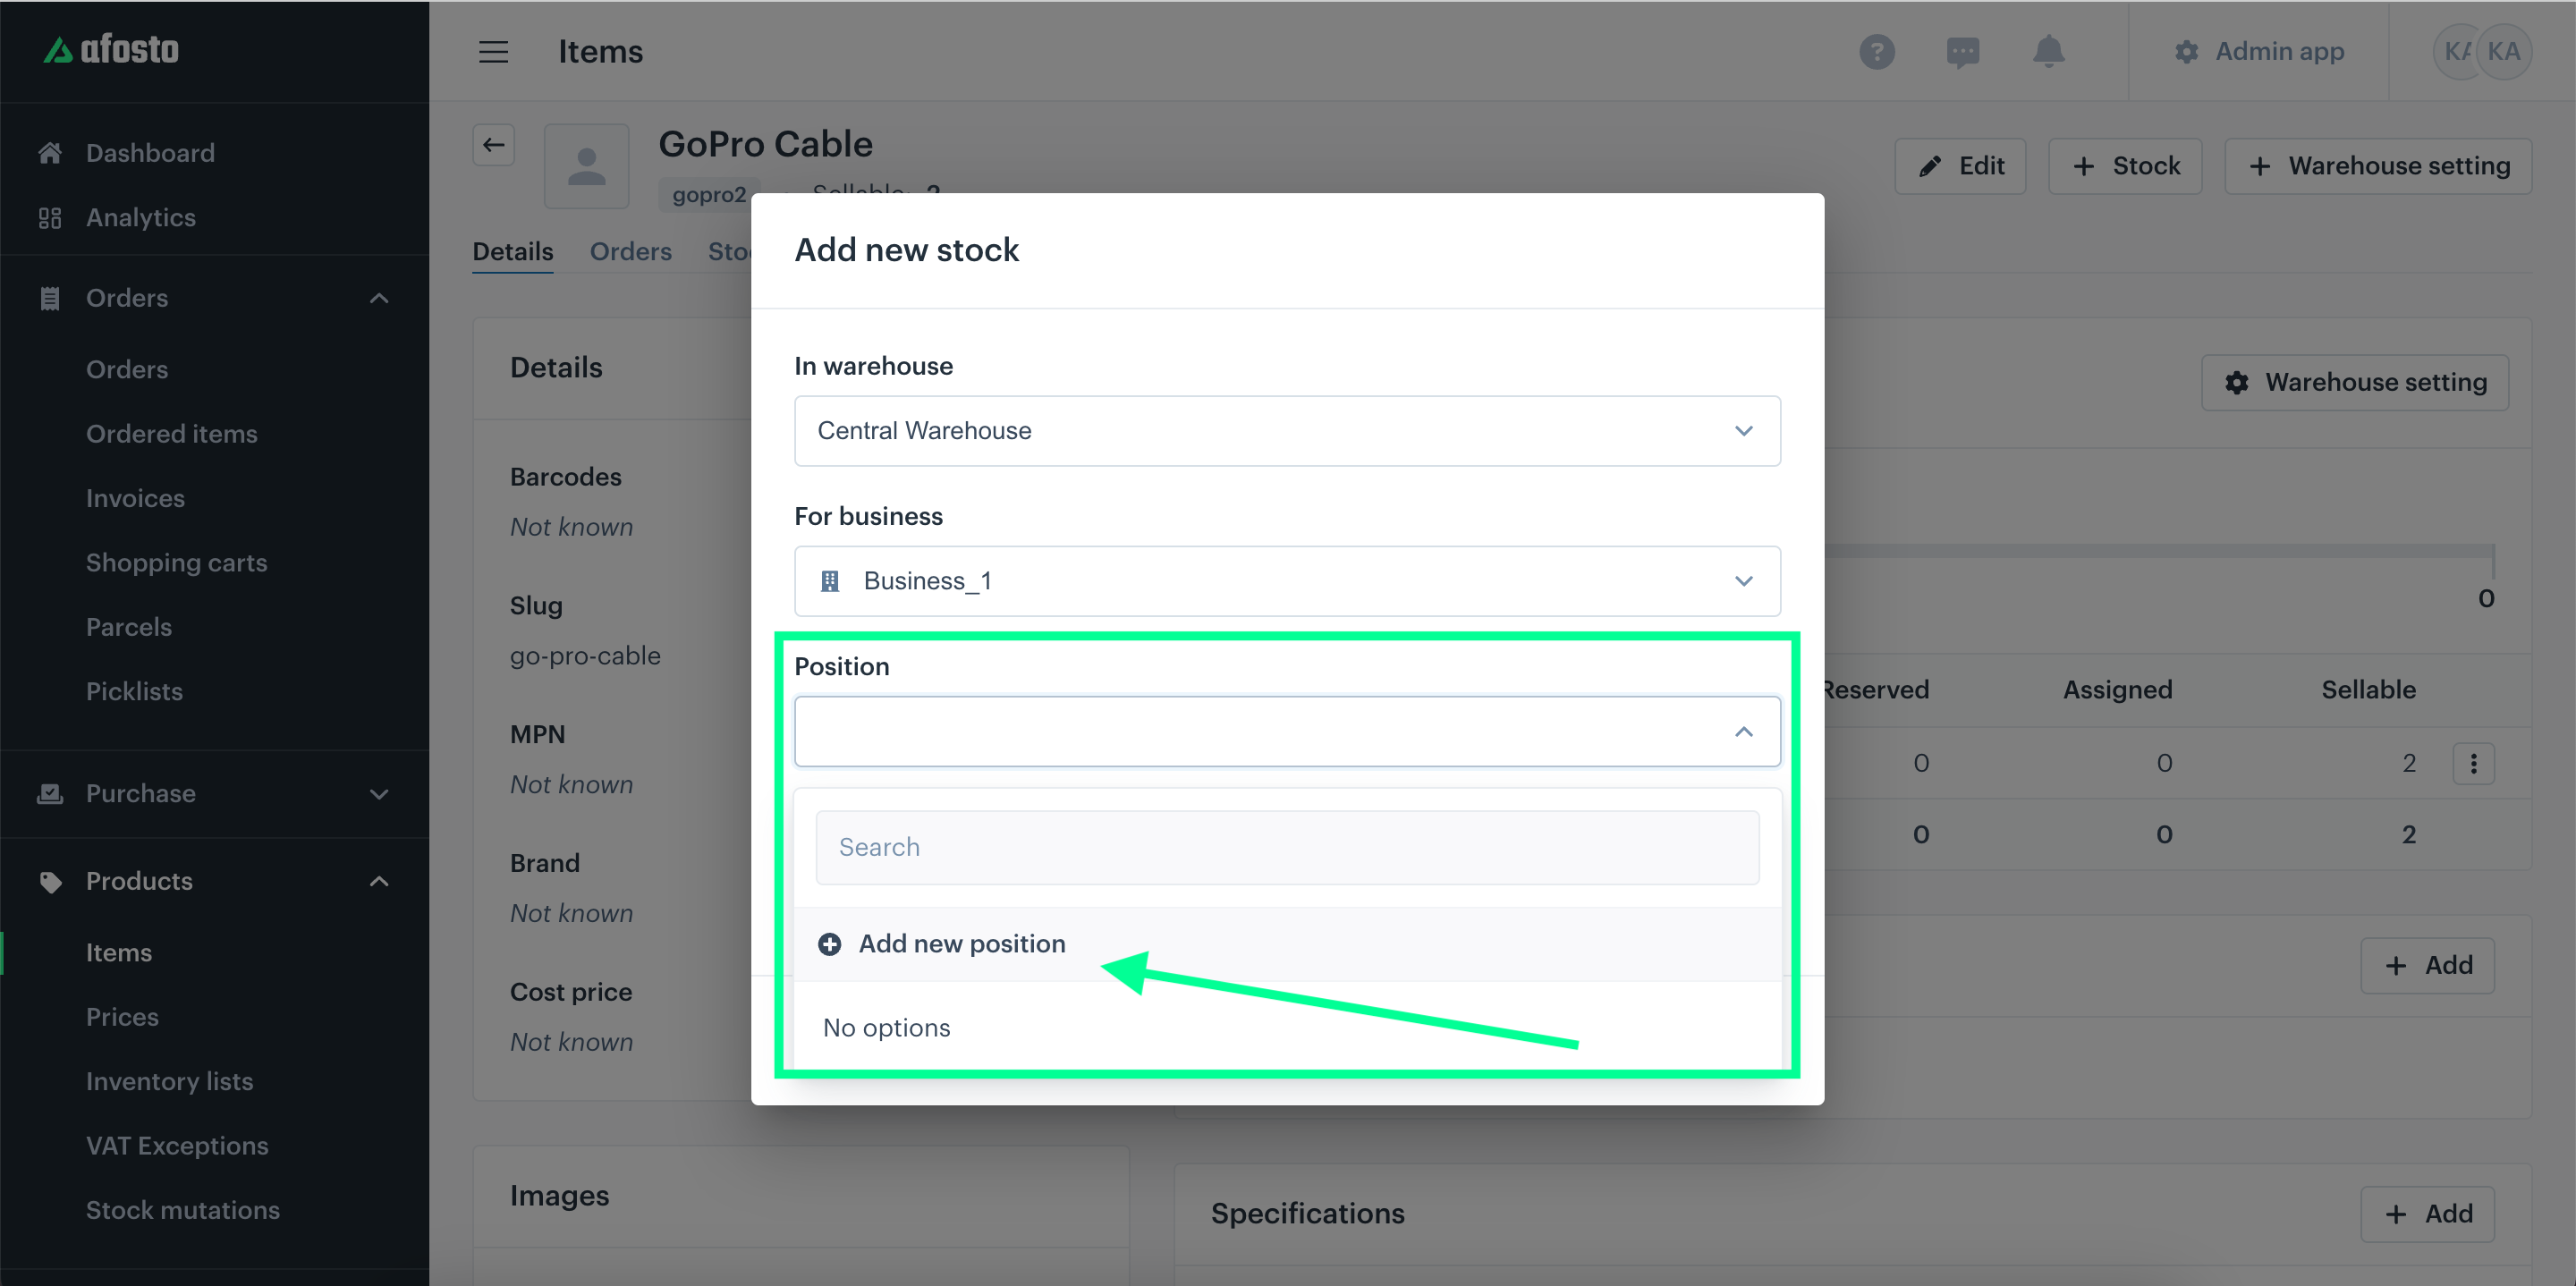
Then, you give the position a name and choose whether it's a Default (normal) or Bulk position. A bulk position usually means you have pallets of inventory there. After adding a position, you can create another for your regular stock. This way, you can use both bulk and regular locations in your warehouse, making your operations more efficient and your inventory better organized.
These positions will be visible in our WMS app, so when you generate a picking list or open an order, you immediately see the correct location for the products used on that order. For more information on scanning and creating barcodes for products, check out our WMS app documentation.
Specify Quantity
With the 'Quantity' field, you specify how many products you want to add to your stock.
Once you're done, click 'Add'. The inventory is now recorded in the system, and you'll see the updated stock in the warehouse section.
Here's how it will look:
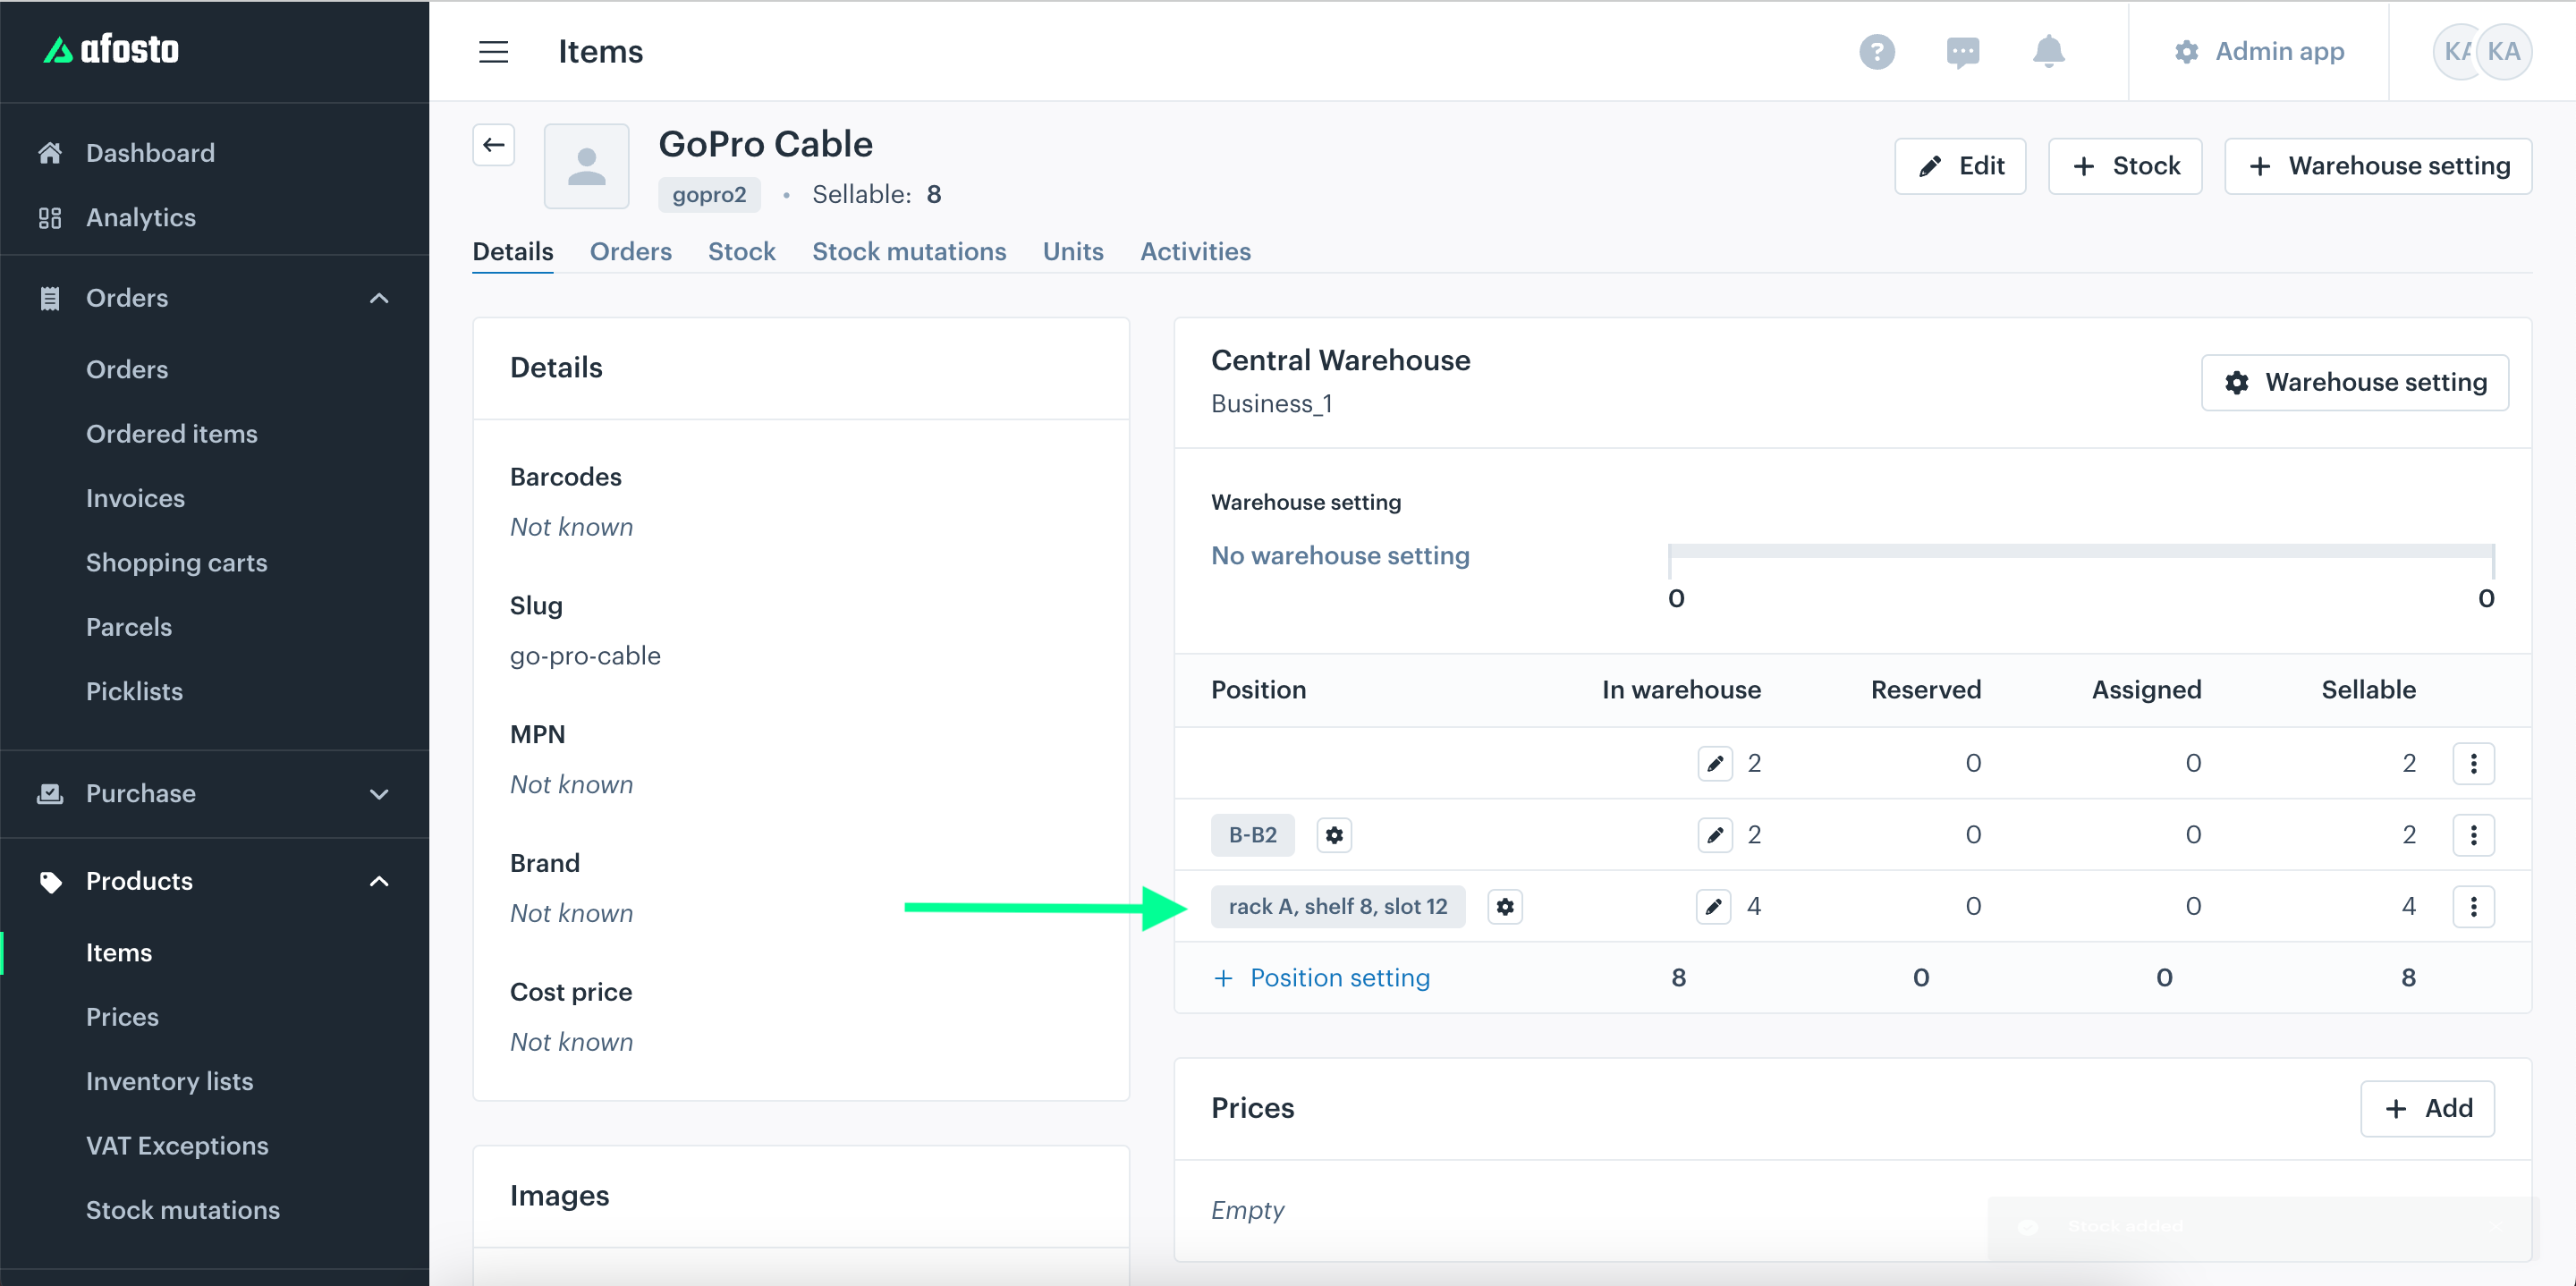
Adding Position Settings
Finally, you can add position settings by clicking the gear icon next to the position name.
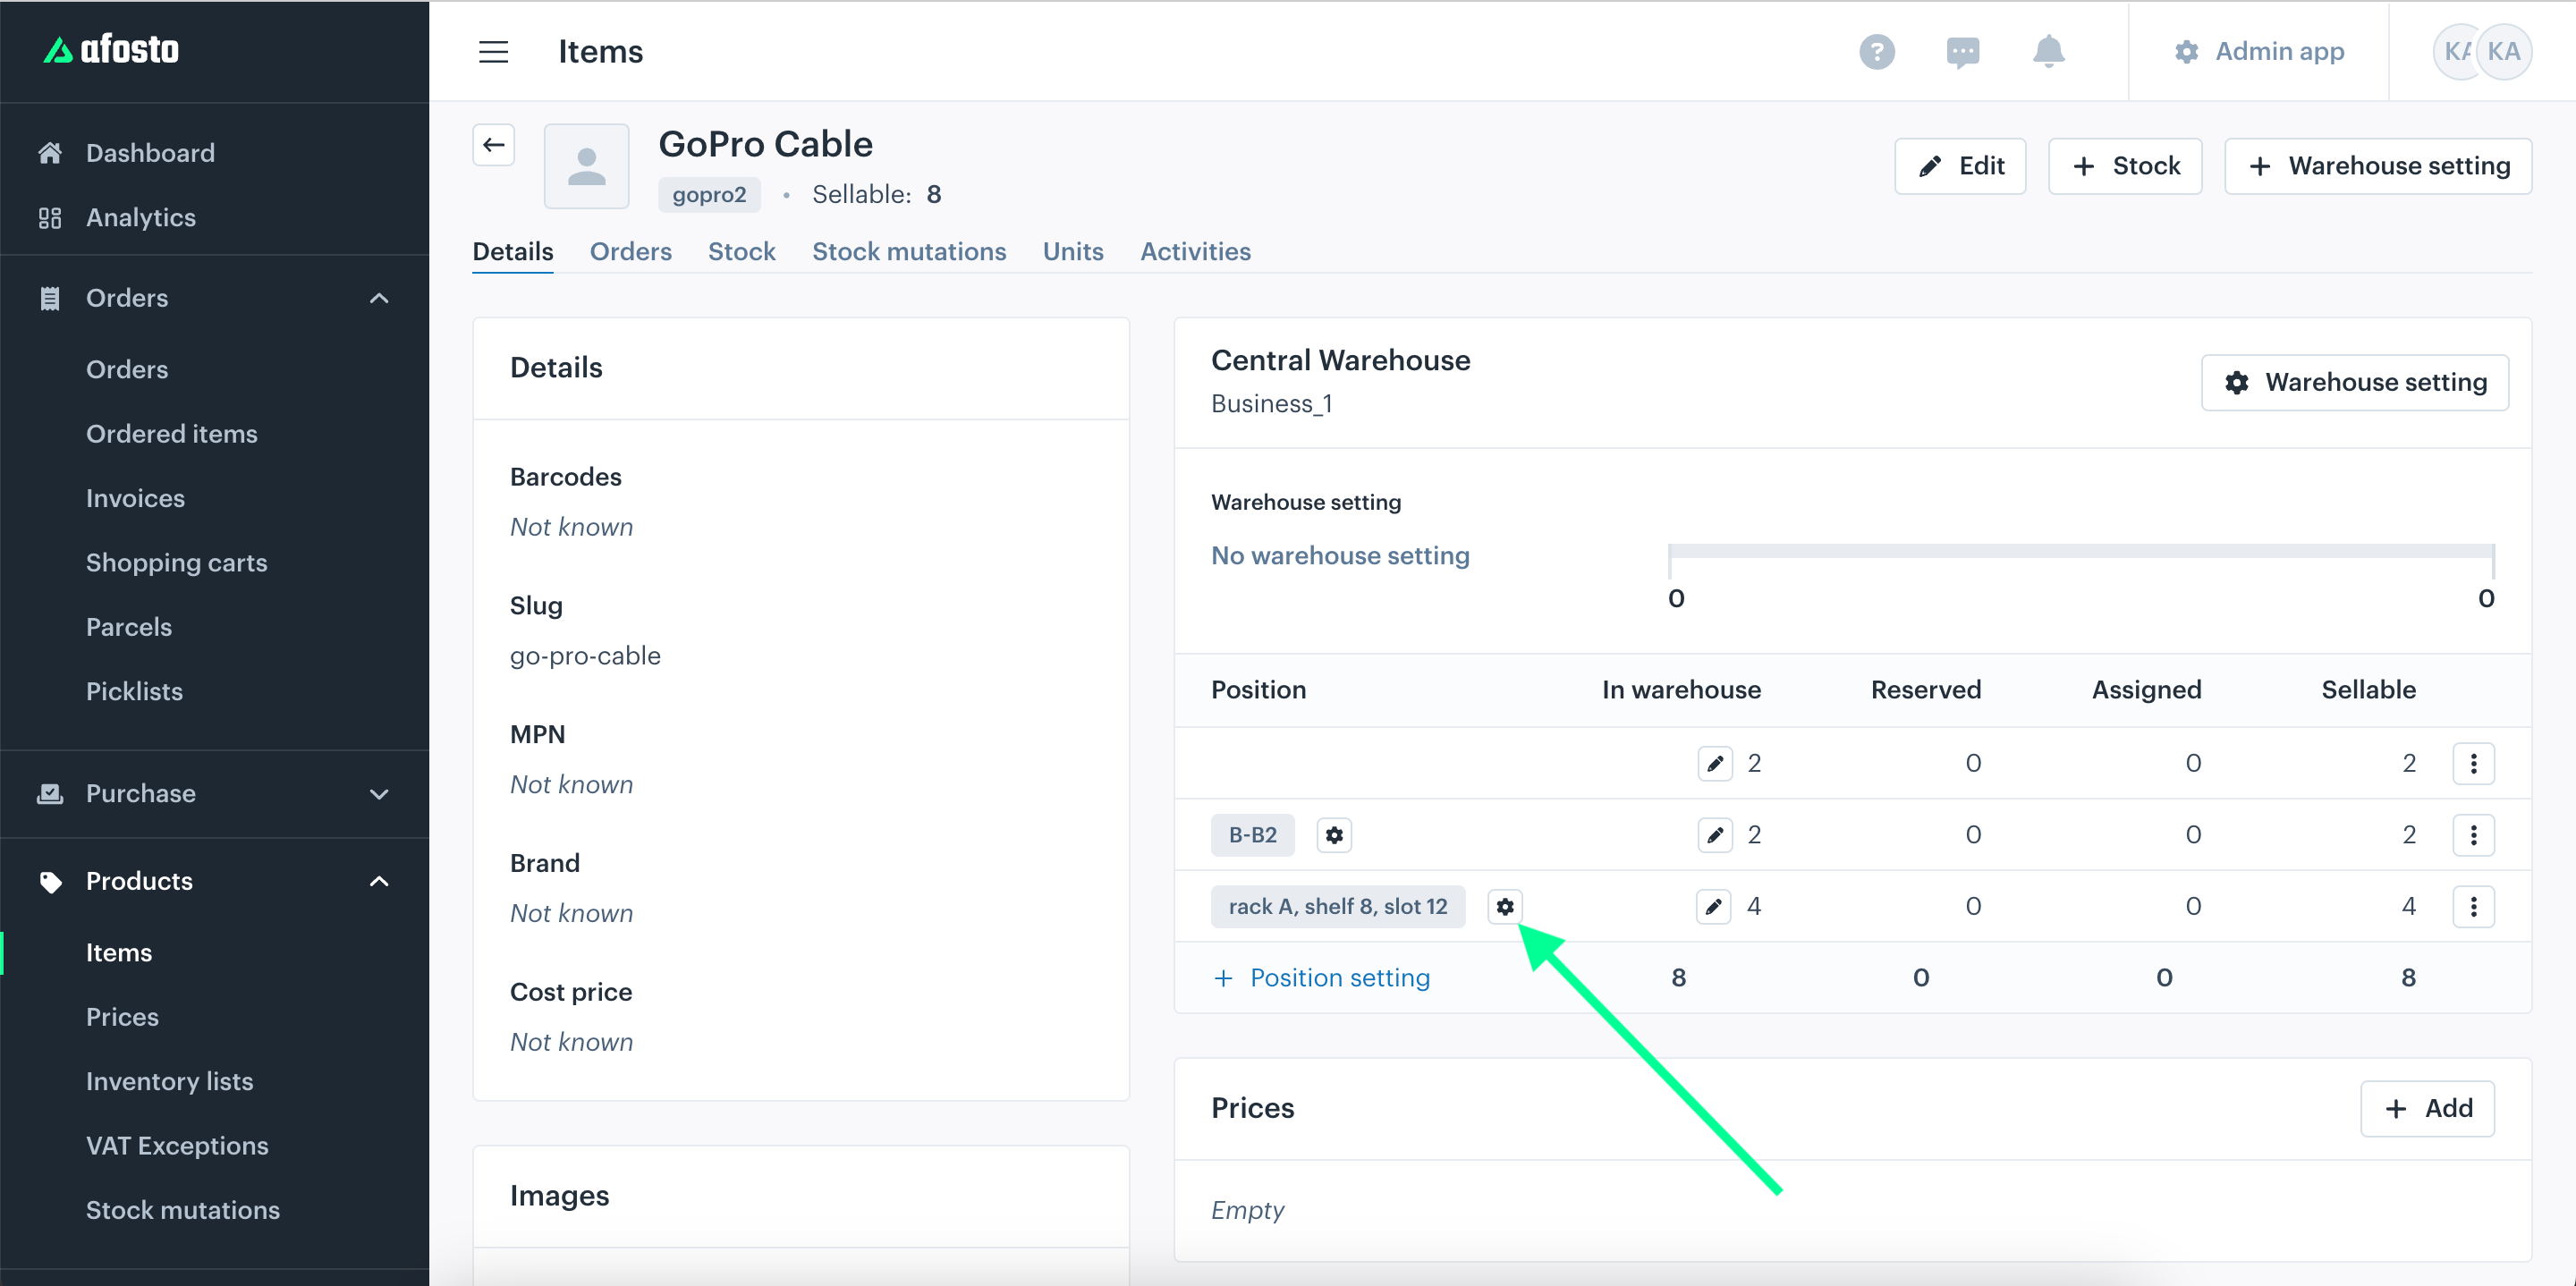
In the window that opens, you can enter various specifications:
Maximum Number of Pieces: 'Limit to a maximum number'. Use this field to set the maximum number of items of this SKU that can fit in this position.
If you choose 'Unlimited', no maximum number of products will be linked to the position.
Position Type: This is useful for products with limited availability or limited-edition items. When the stock reaches zero, the position will be freed up for other products.
Lastly, click 'Save'. I've added an extra position named 'F2'. This position is unlimited and set as a 'Bulk position'. You can specify this when creating a new position. If the position has already been created, you can change this setting elsewhere.

To adjust position settings, look in the positions documentation.
Here's how it will look:
If another pallet comes in, there won't be space on position F2 in the system. To allocate a spot for this pallet, you can now choose a temporary position.
Now you're done adding inventory and adjusting position settings.
Warehouse Settings
With warehouse settings, you can apply different settings to your inventory for each warehouse for a specific SKU or product.
To start:
Click on the 'Warehouse Settings' button. You can click the button at the top right or the one next to the specific warehouse you want to configure. If you click the button at the top, you can also add a new warehouse for this product.
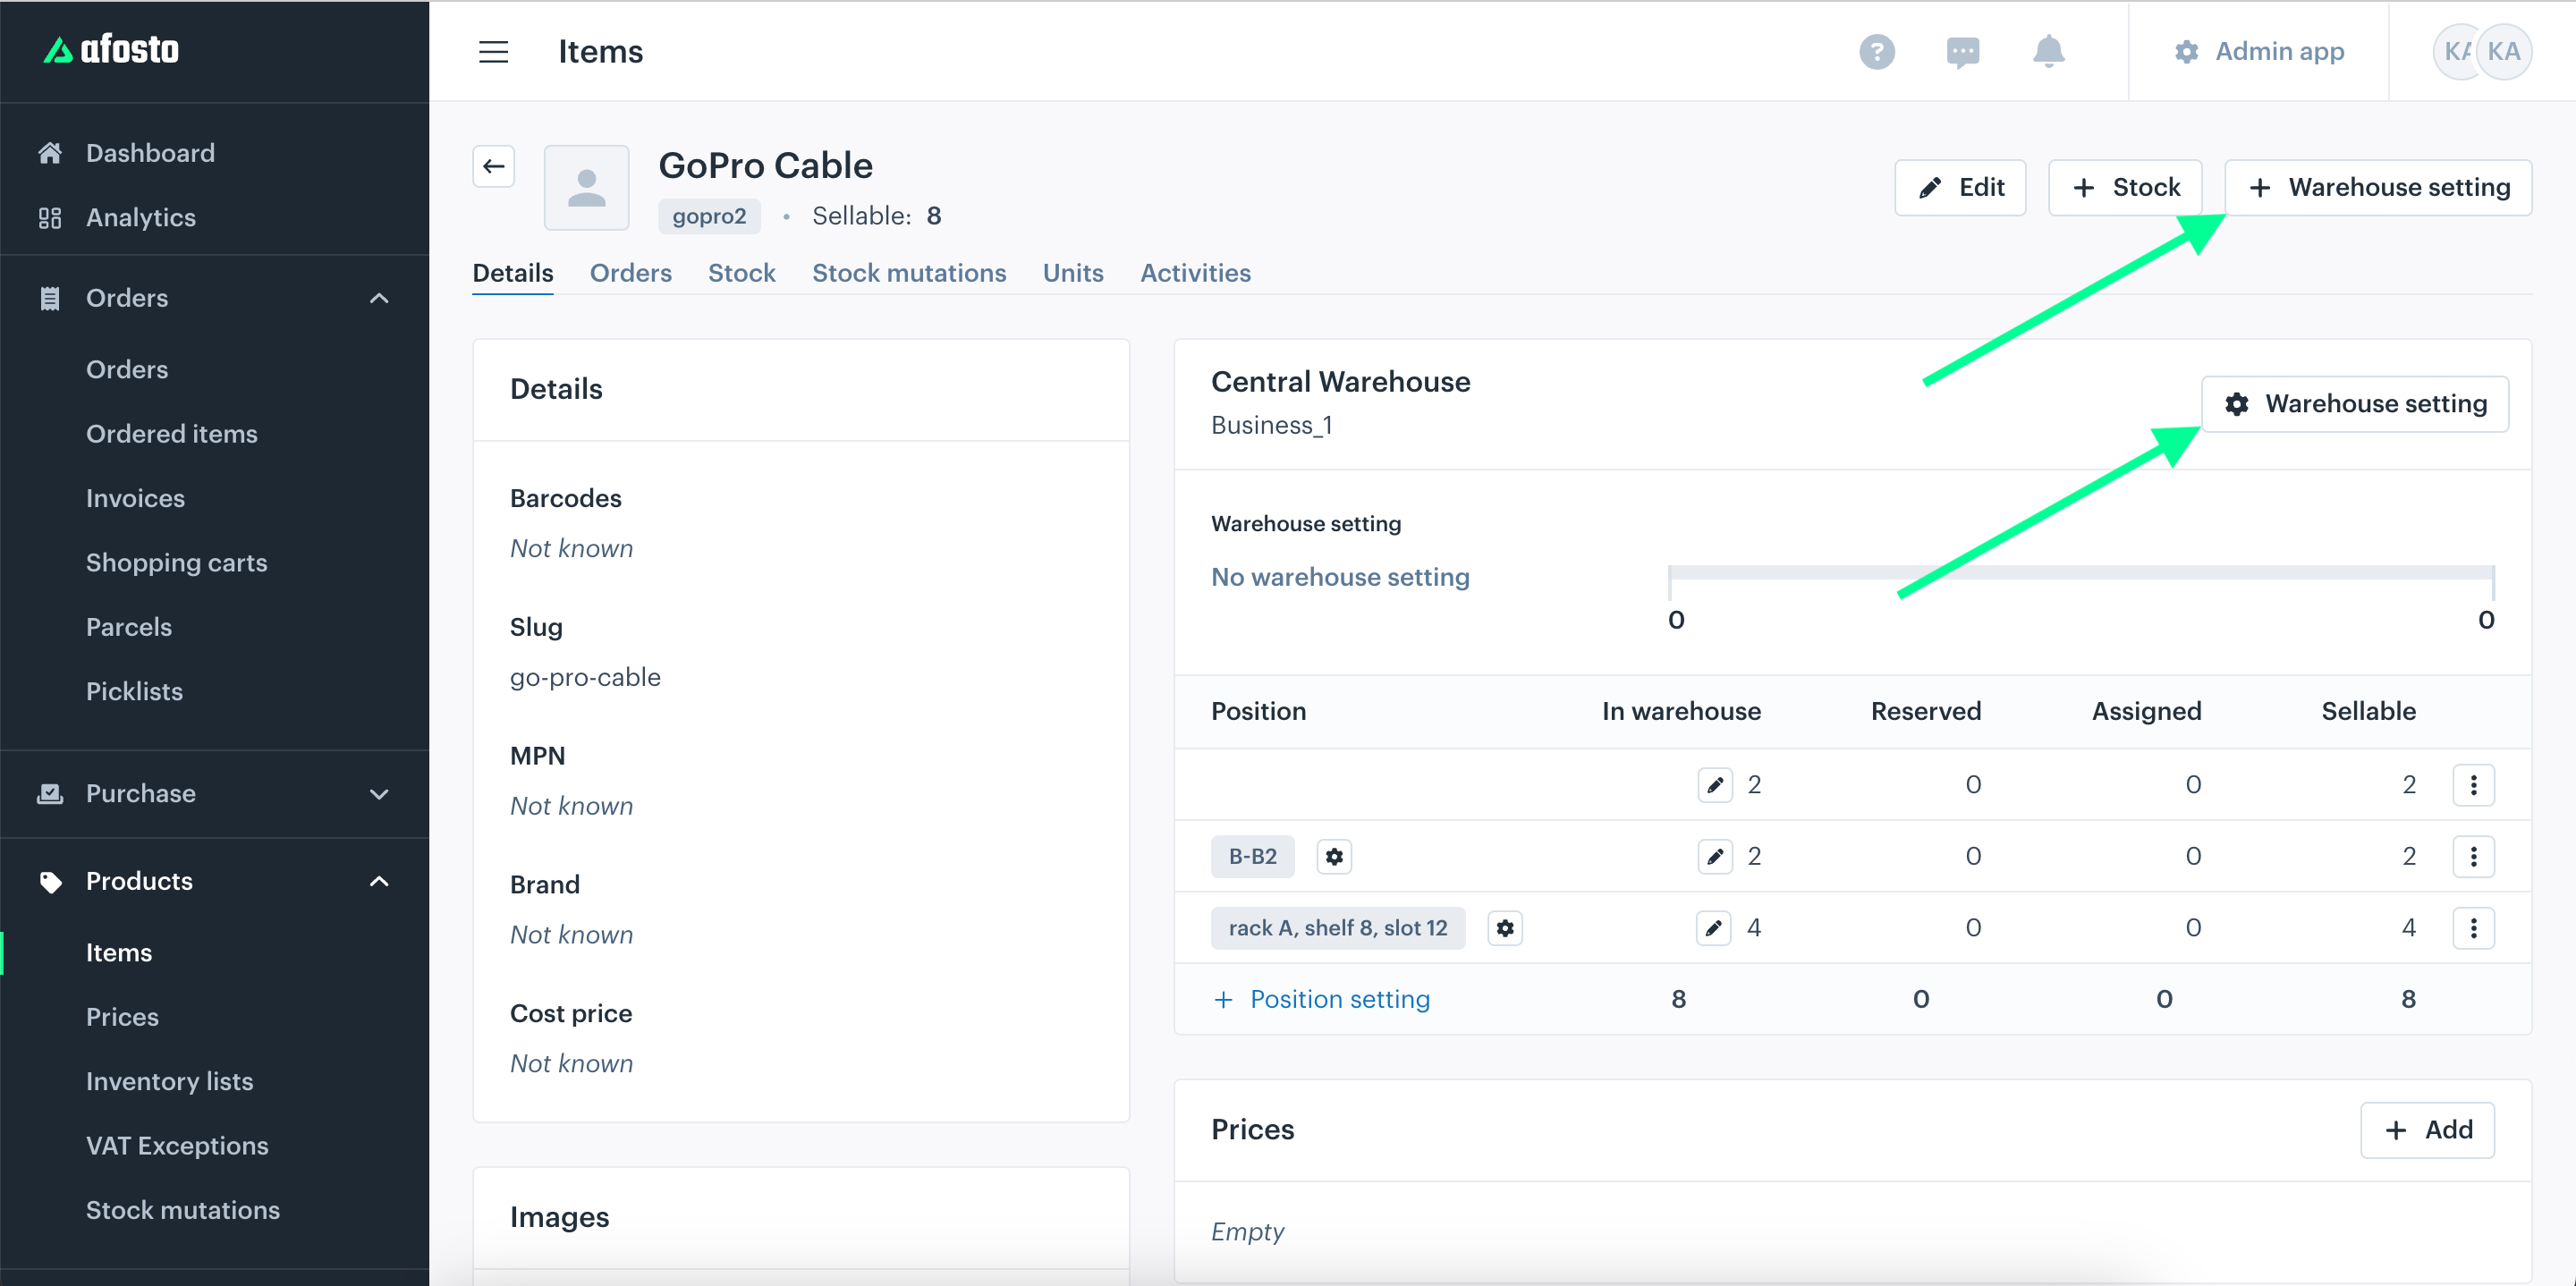
After clicking the button, this menu will open:
In the first part of this menu you can find 5 product settings.
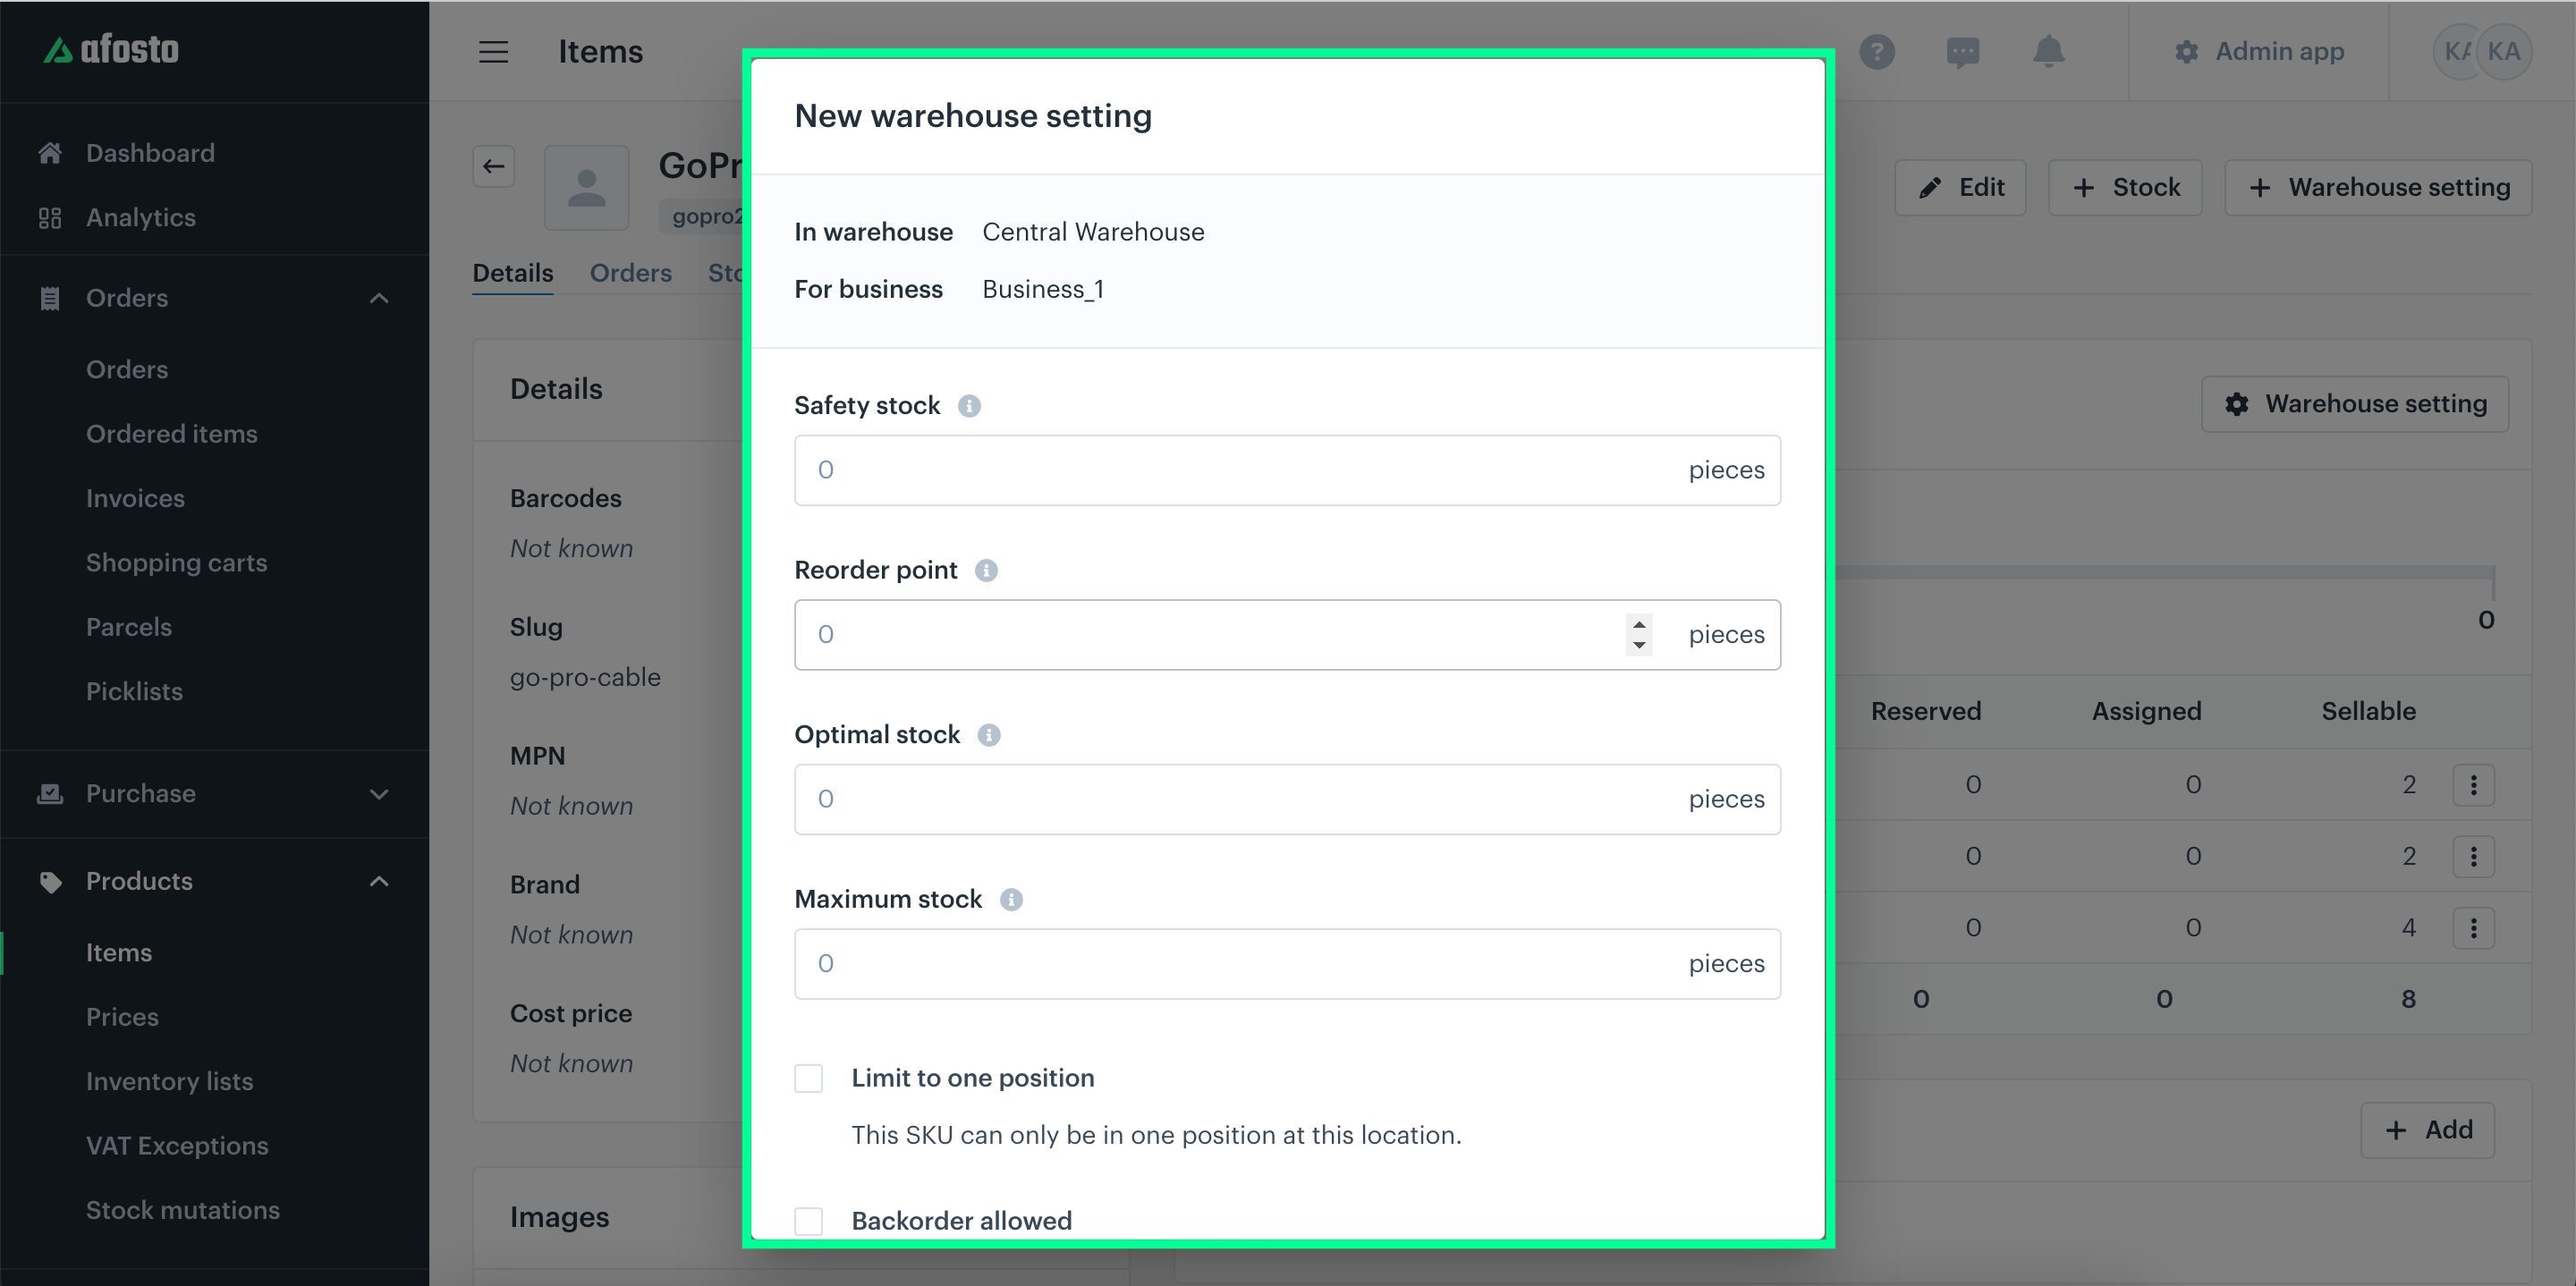
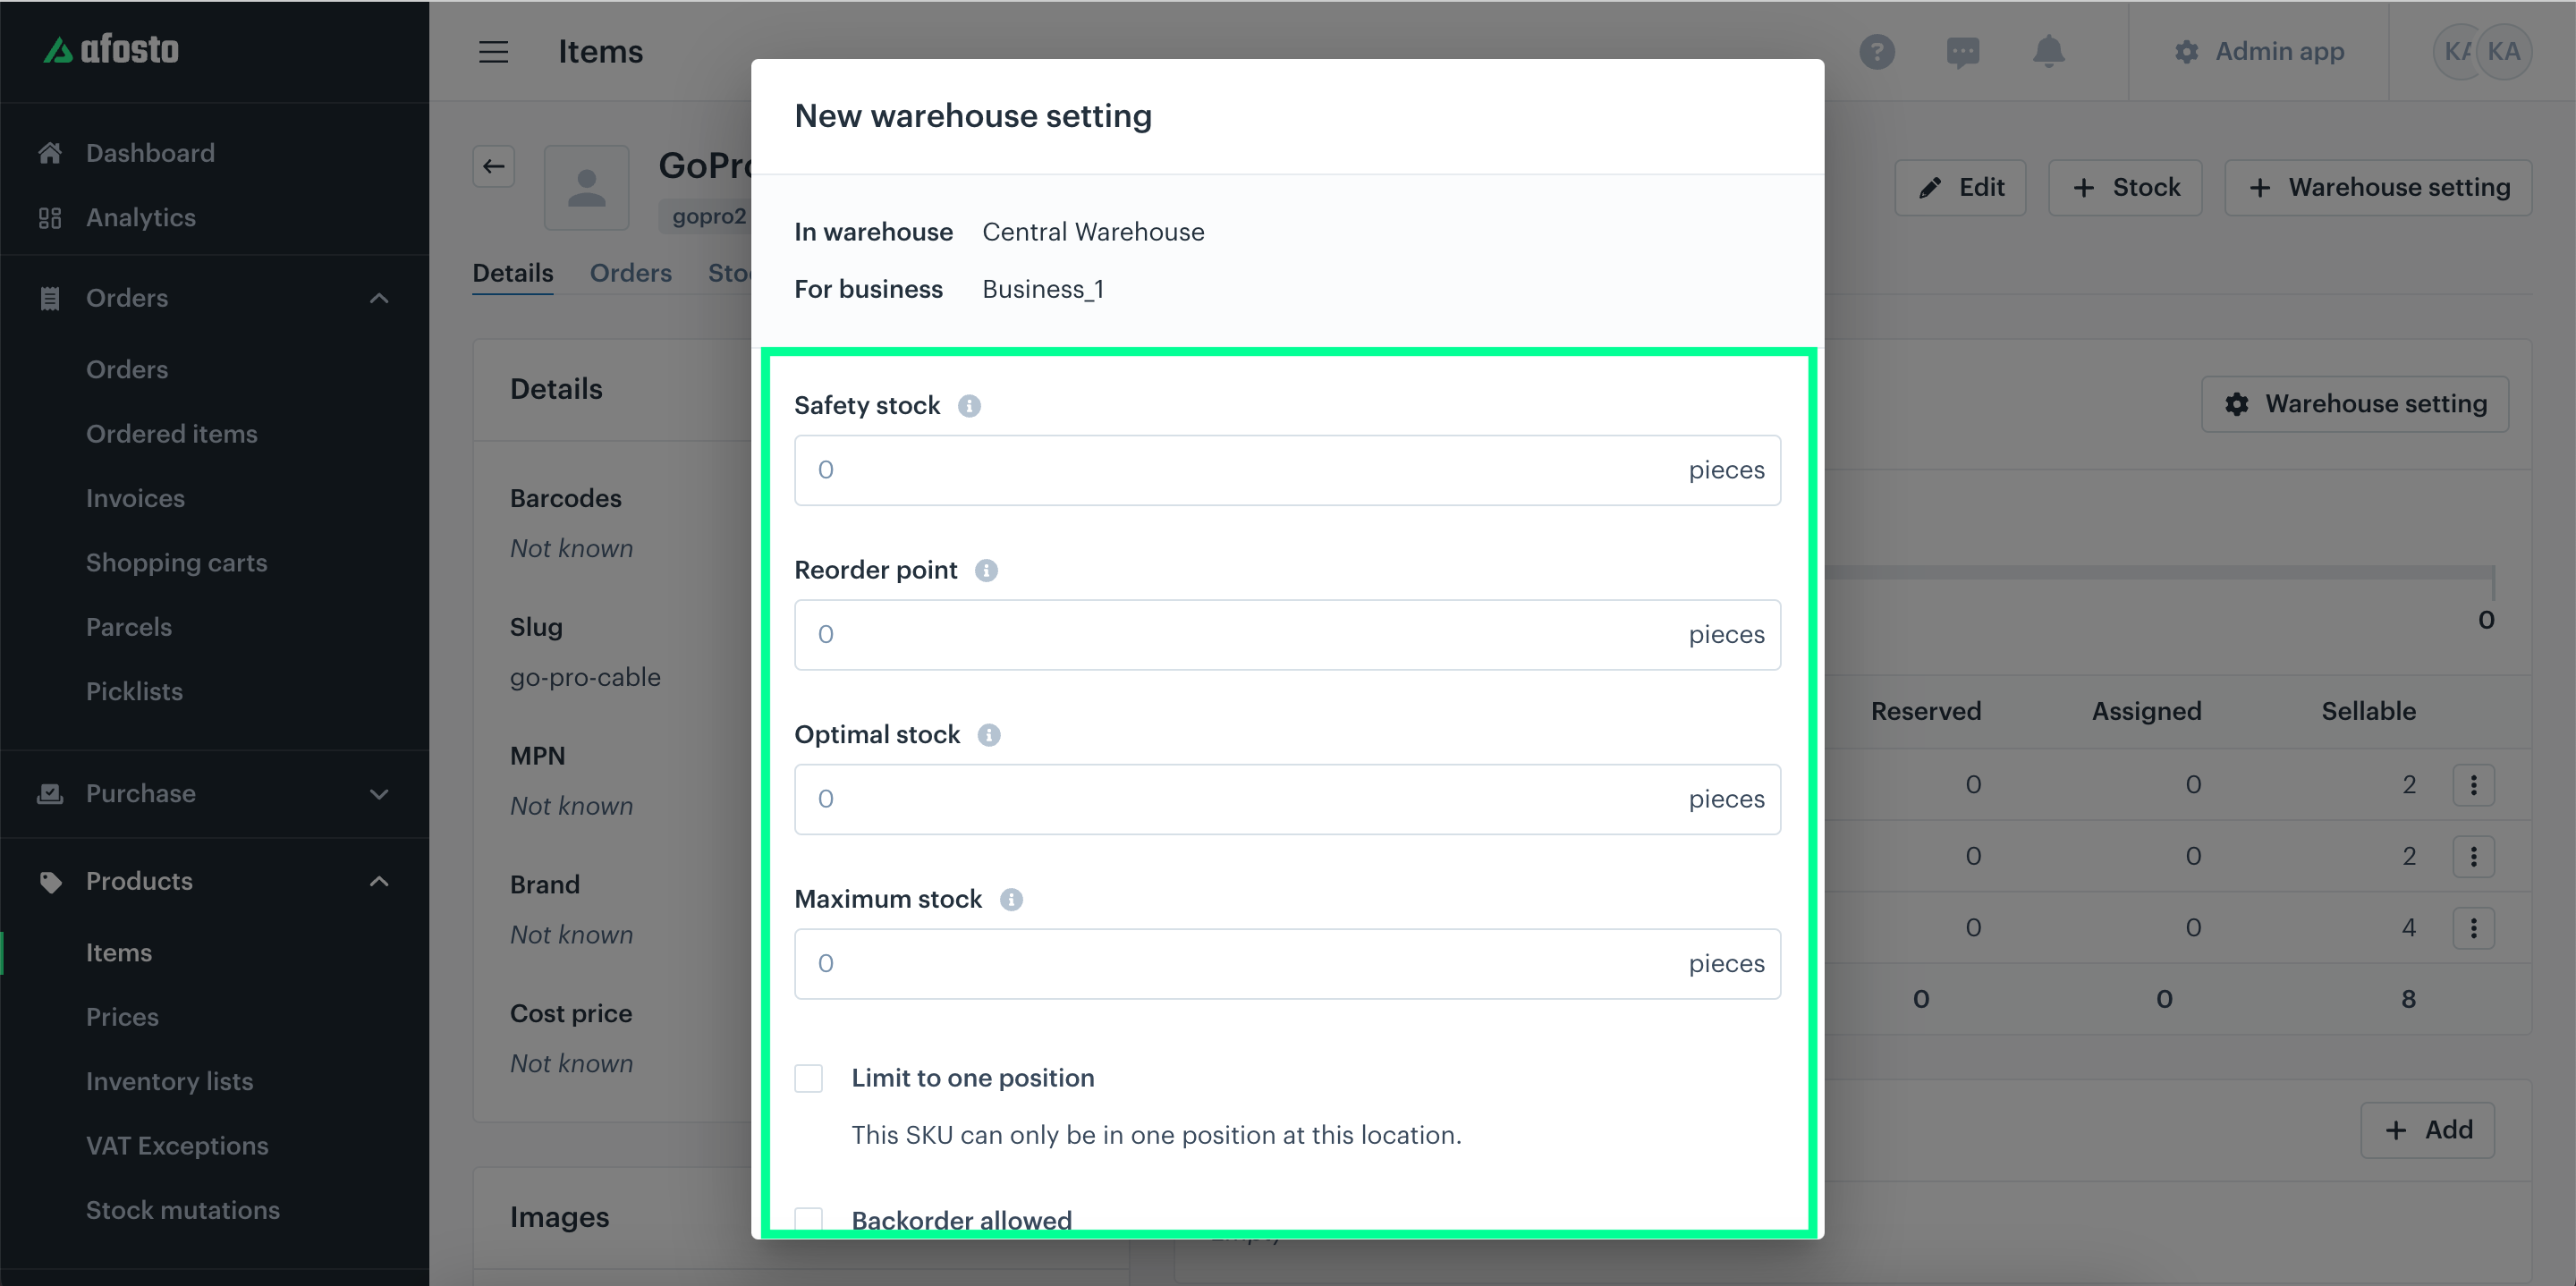
Safety Stock
- This is the inventory level you always want to maintain in your warehouse. It's useful if you have a physical store and want to ensure that customers can always buy the product.
Reorder Point
- This is the reorder point, the inventory level at which you should reorder stock. When your stock falls below this threshold, you can receive a notification. This notification allows you to, for example, purchase new stock. Reorder points are also utilized in generating replenishment lists; when a product's inventory drops below its reorder point, it will be added to a replenishment list for a specific supplier when you create one.
Optimal stock
- This is the inventory level that will be used in replenishment lists. When you create a list, the difference between the actual stock and the optimal stock will be added to your list. This, of course, will only happen when the stock is below the reorder point.
Maximum Stock
- This is the maximum number of products you want to keep in stock in this warehouse.
Limit to One Position
- If you want this product to always be in the same place, you can enable this setting.
- For example, if you don't want to use a bulk location and prefer to place products in one row on a rack with pallets above and individual items below.
Backorder Allowed
- When this setting is enabled, it allows the product to be ordered even if it's no longer in stock.
- This can be relevant if you work with preorders and thus don't have stock in your warehouse.
Pre-order deadline
- In ons WMS gebruiken we pre-order deadlines. Je hebt een instelling voor pre-order deadlines nodig om producten te kunnen bestellen tot de deadline voor voorbestellingen is bereikt, zelfs als er geen voorraad beschikbaar is in het WMS. Nadat de deadline is bereikt, kan het product niet opnieuw worden besteld totdat er weer voorraad beschikbaar is.
Product Units
The "Add Product Units" feature in our Warehouse Management System (WMS) lets you define various units of measurement for products, enhancing both stock management and operational efficiency. This allows you to categorize products by different units, streamlining the processes of counting, ordering, and adjusting stock.
For example:
- Per Piece: A single unit is added to the inventory.
- Per Package: If one package contains 12 pieces, adding a package automatically increases stock by 12.
In the Afosto system, 'pieces' is the default unit for inventory tracking. This ensures consistency across stock management, regardless of the unit in which products are added. When you input products using different units, such as crates or boxes, the system automatically converts and displays the total stock in terms of individual pieces.
For your understanding:
- If you add 2 crates, each containing 24 pieces, and later add 20 loose pieces,
- The system will register the total inventory as 68 pieces instead of displaying "2 crates and 20 pieces."
Key Benefits of Using Units
- Adding stock quickly and efficiently: Add stock in bulk (e.g., packages) rather than manually updating piece-by-piece.
- Ordering in different units from your supplier: You can order products in other units than you sell, allowing you to purchase in bulk packages while selling per piece. The system automatically converts these bulk units into the default tracking unit, ensuring accurate inventory records after purchase. (e.g., purchase in bulk packages while selling per piece).
How to Add Product Units
Click the “Units” tab on the product detail page.

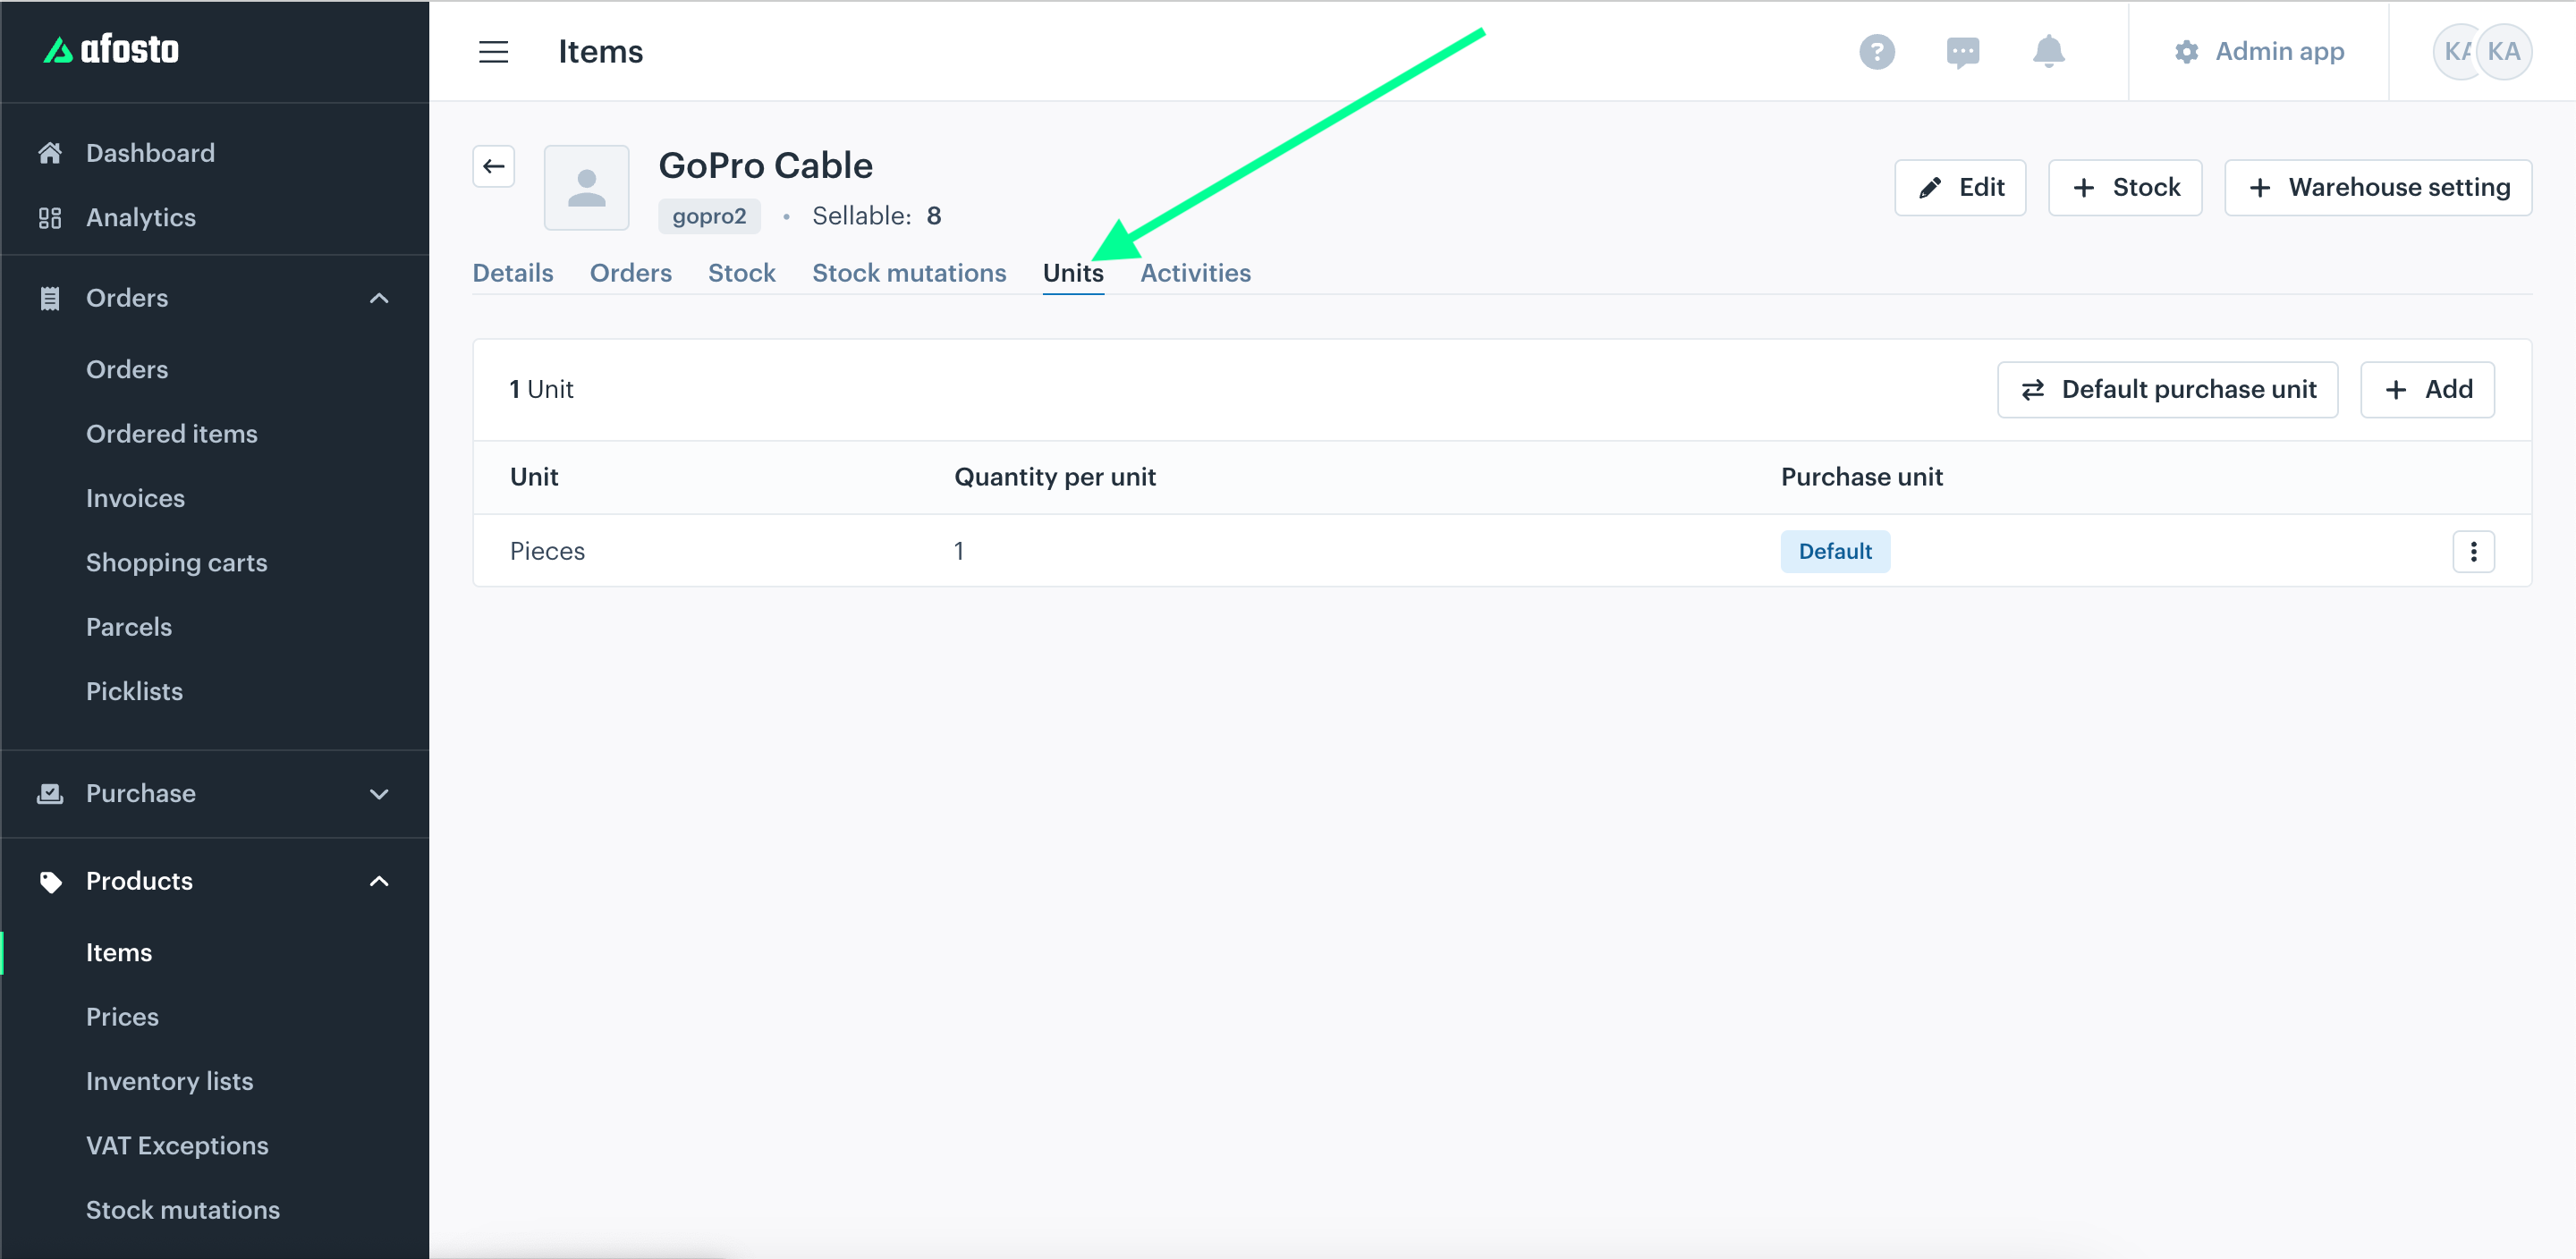
Click the “Add” button, and an Add unit modal window will appear. Enter the Type and Quantity of the product.

Stock Variables
To add stock with more specific details on the Afosto platform, activate and configure default fields for product registration under the 'Stock Variables' section. This ensures key product details are uniformly captured, improving inventory management.
Set required variables globally at the account level to apply them to all stock records, or individually at the product level to override the default settings.
While adding or editing product details, select from the following mandatory stock variables in the 'Register Stock Variables' section:
- Batch Number
- Serial Number
- RFID
- Expiration Date
- Weight
These settings can be customized for each product, providing flexibility and ensuring consistent data entry.
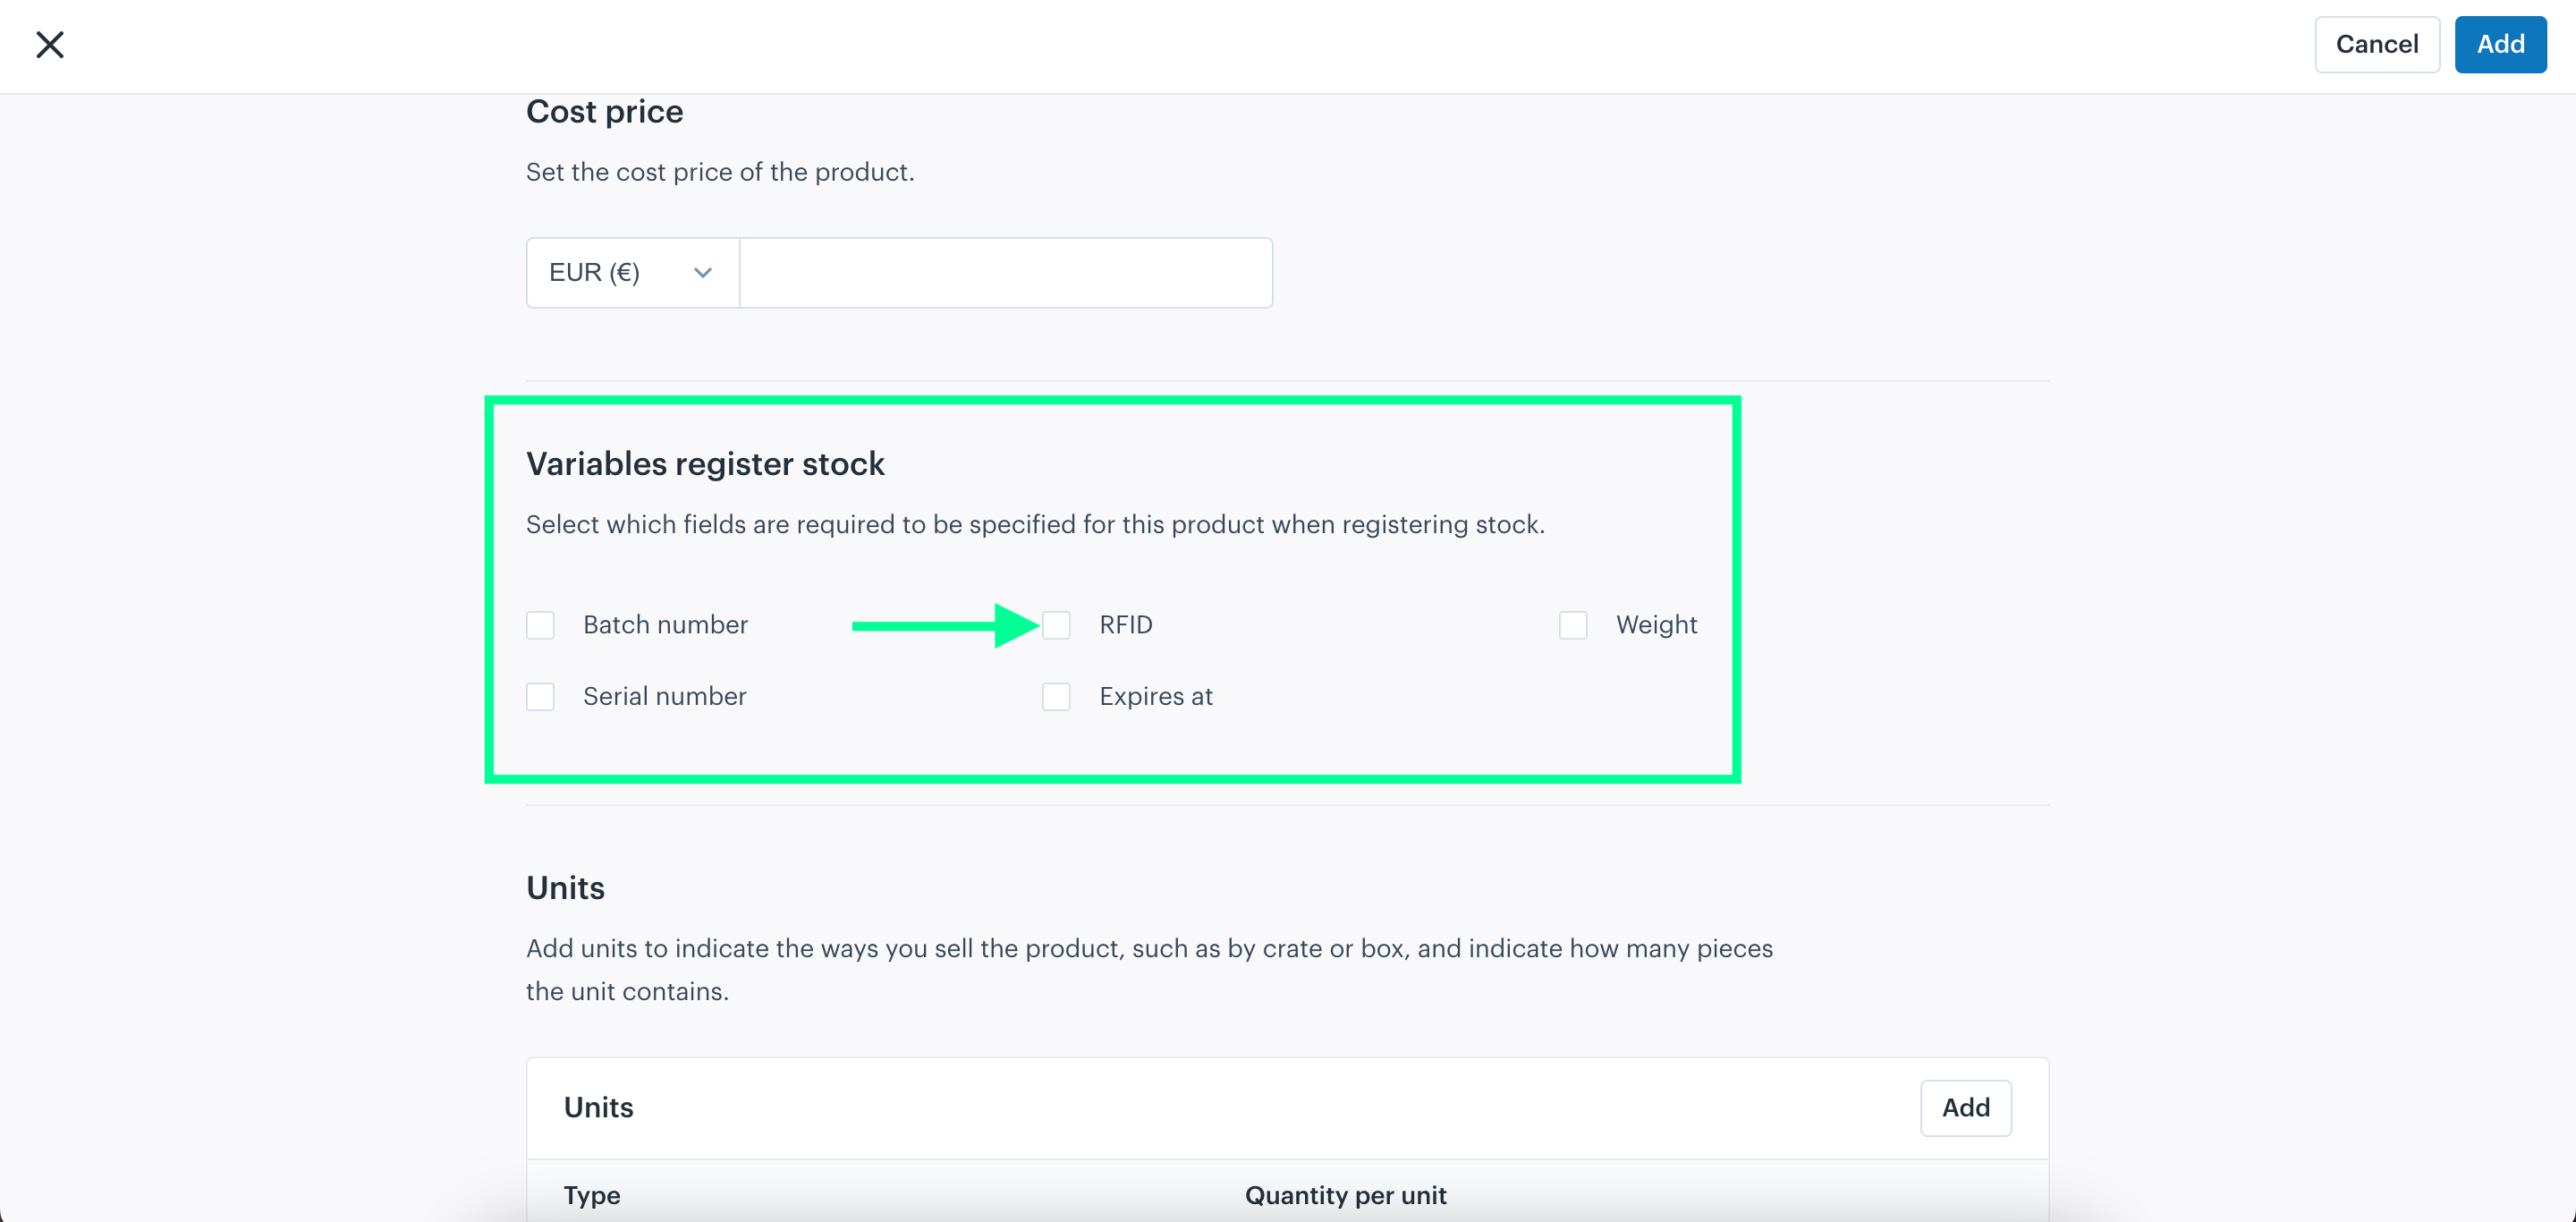
Setting Stock Variables at the Account Level
When creating or editing a product, you can view the "Variables register stock" section. Select the desired variables by checking the corresponding checkboxes.

After adding the product or saving the edited product now you need to add stock variables.
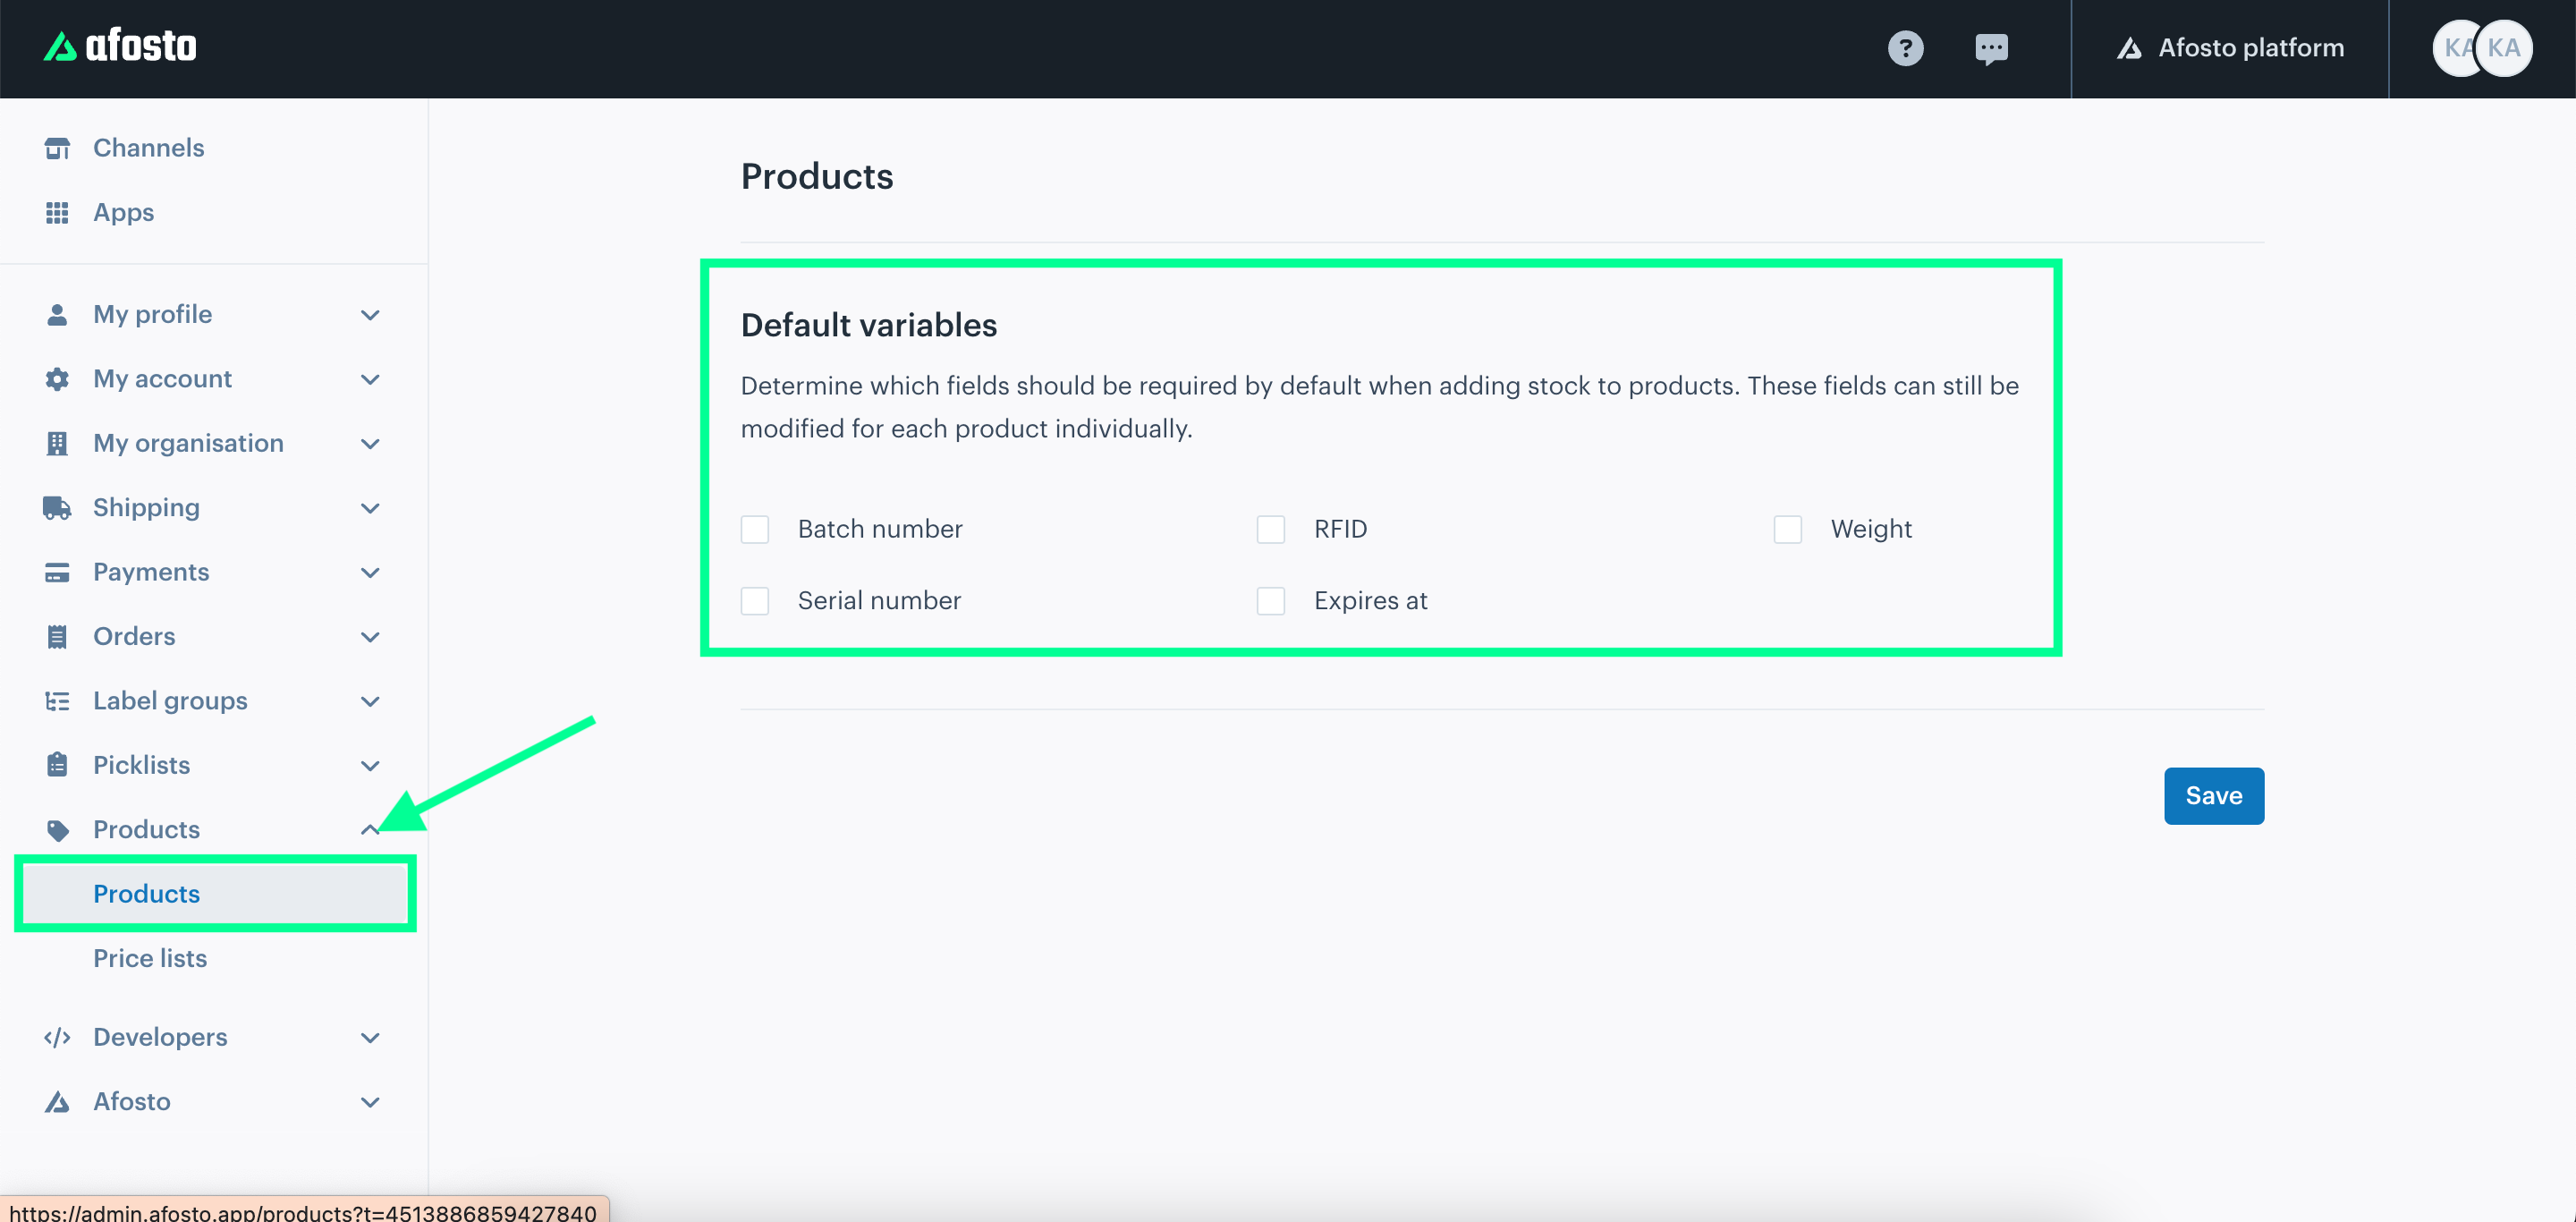
Overriding Stock Variables at the Product Level
Navigate to the Admin app and select the Products section. Here, you will find the Default Variables window, where you can determine which fields should be required by default when adding stock to products. These fields can still be modified individually for each product.
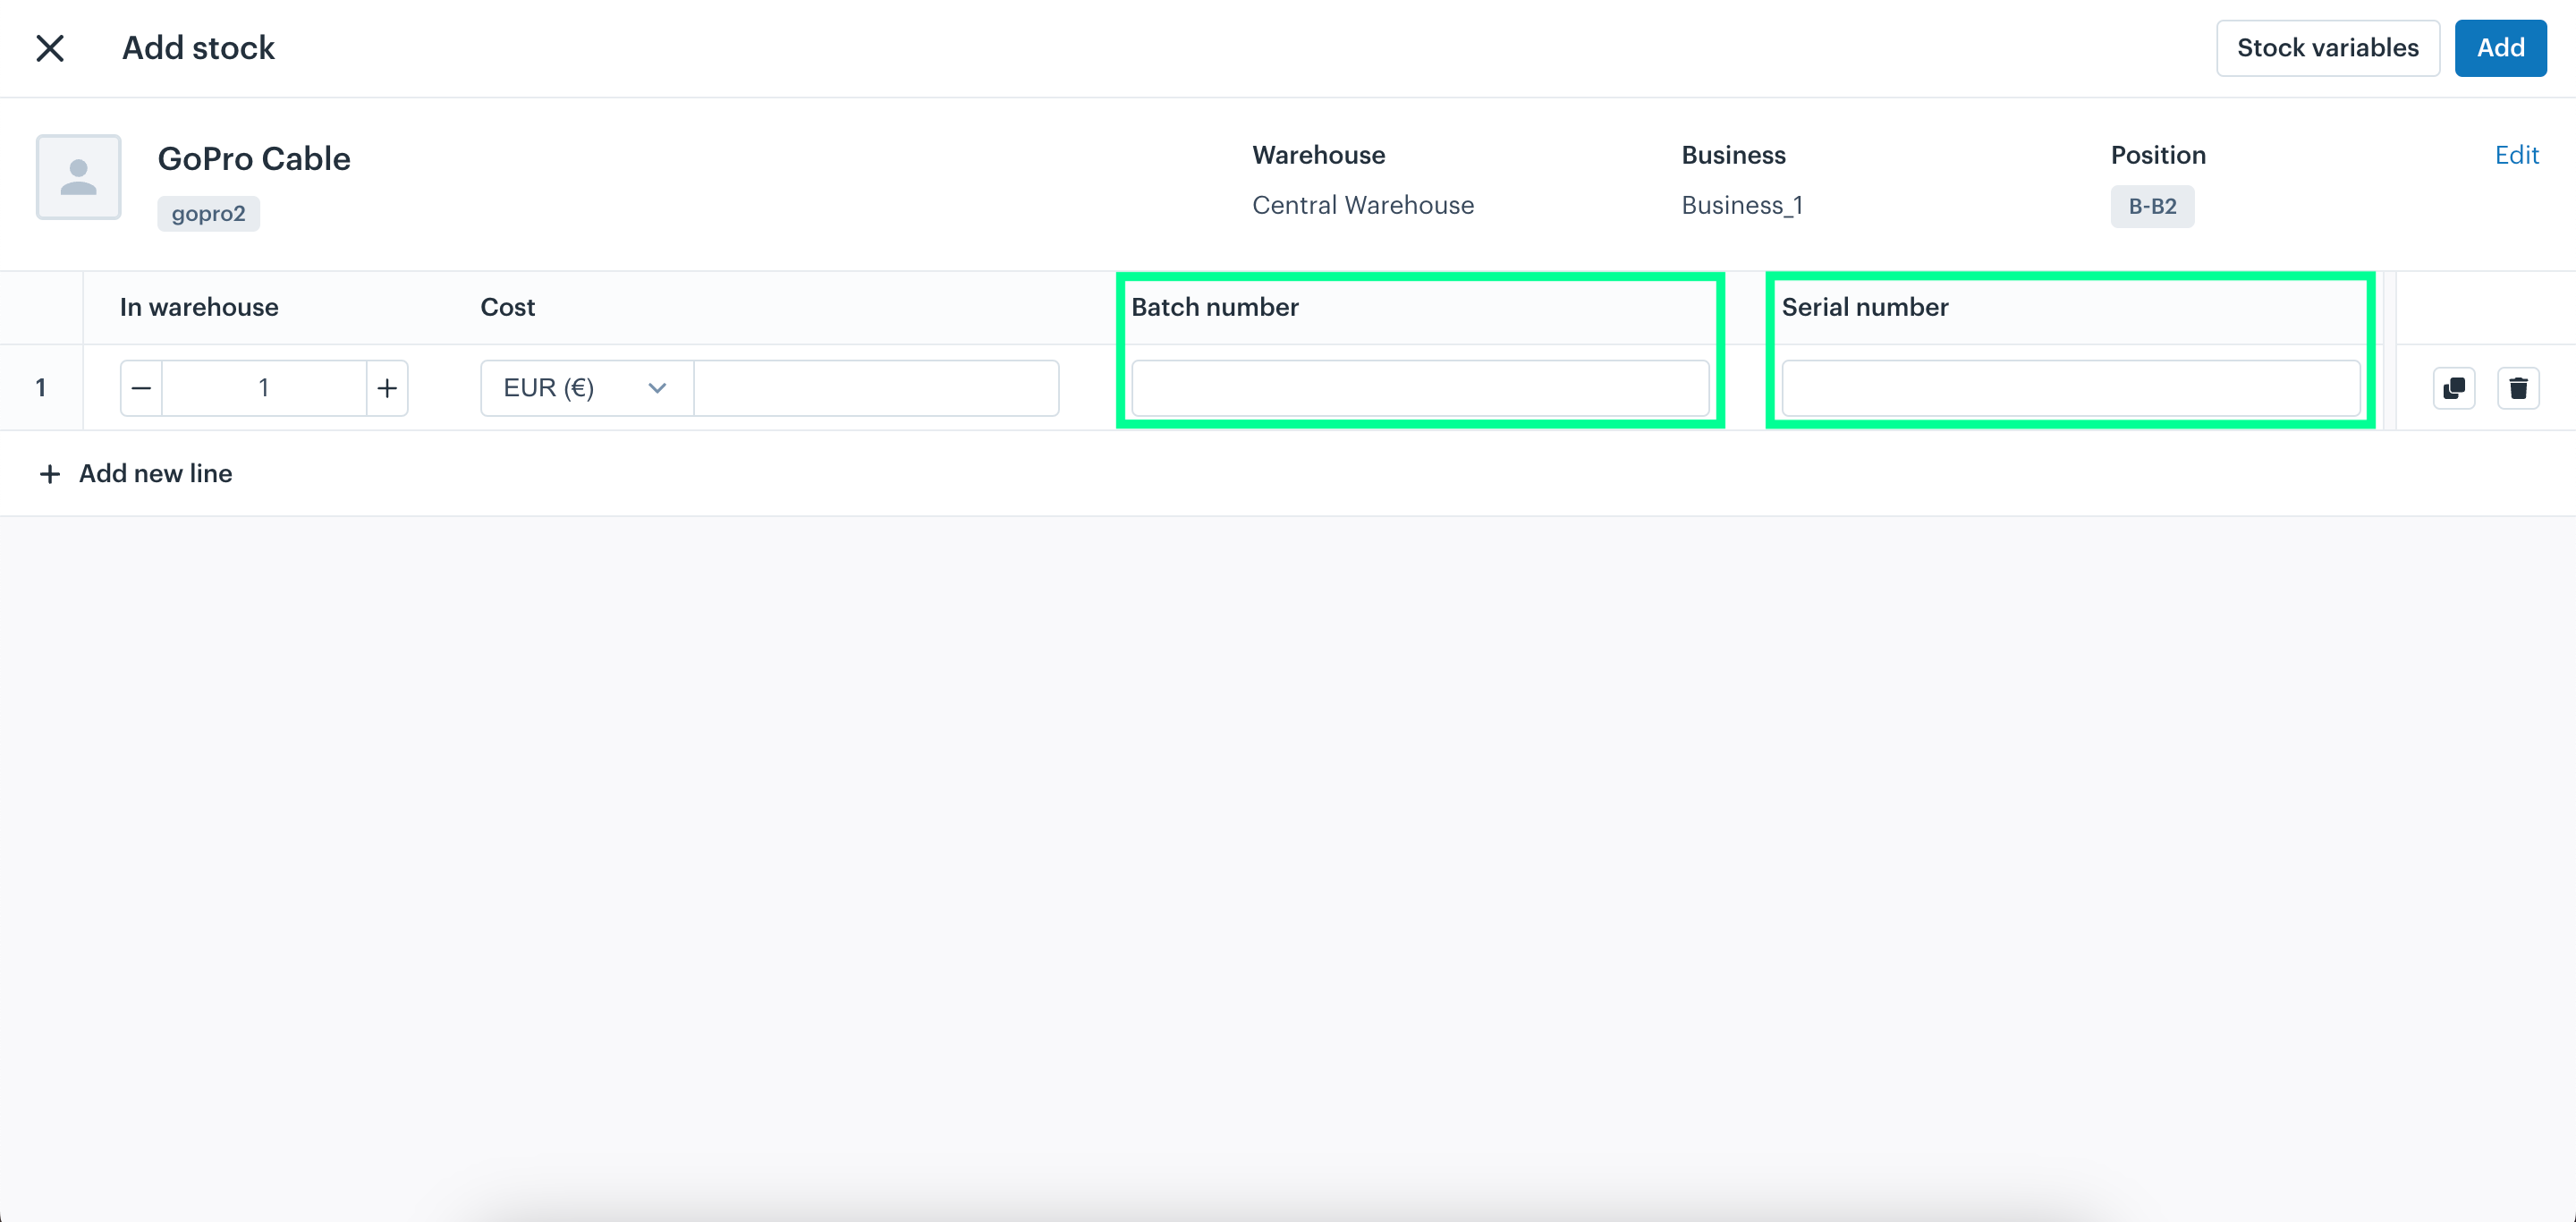
Adding Stock with Required Stock Variables
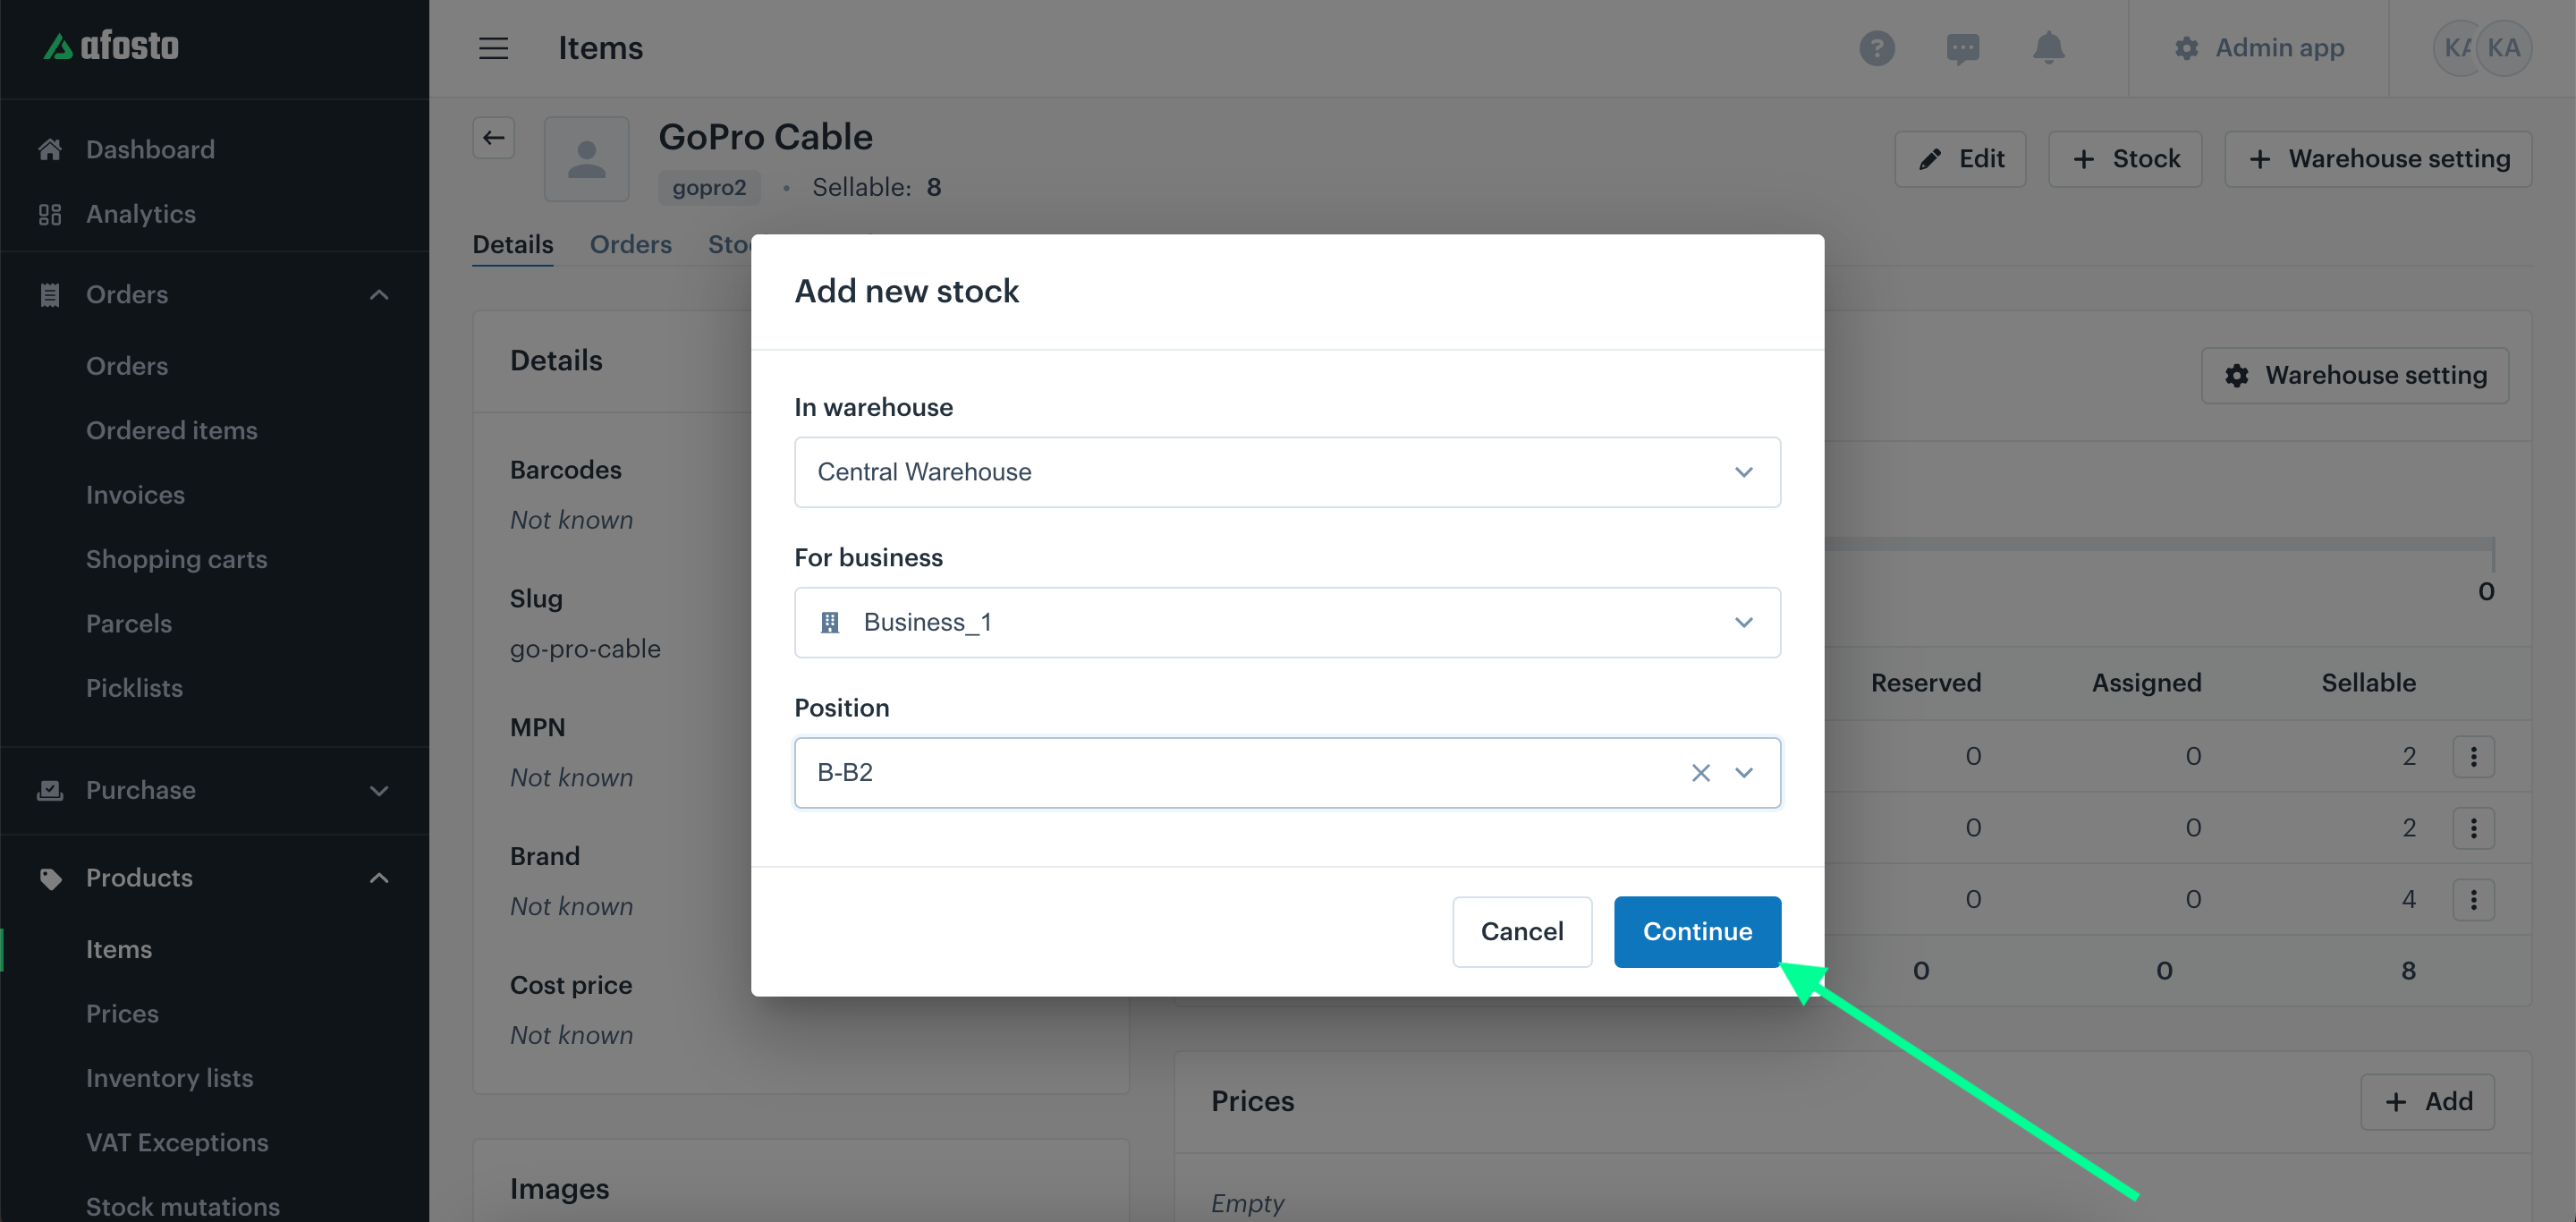
When you are on a product detail page, navigate to the "Add New Stock" window and click the "Continue" button.
When you are on a product detail page, navigate to the "Add New Stock" window and click the "Continue" button.
An "Add Stock" window will appear, displaying fields where you can enter values for the registered values as they are mandatory to fill. For example, you can enter the “Batch number” and “Serial number”.
Examples
When you add inventory to the Afosto platform, you can assign unique variables to each item, such as expiration dates, serial numbers, or cost prices. This approach ensures that each inventory record captures distinct characteristics, allowing for individual identification and tracking of every item. For instance:
- Expiration Dates: This variable is crucial for managing items that have a limited shelf life, such as food products or medications. By recording expiration dates, you can ensure product safety and compliance with regulations, while also optimizing the inventory turnover by using a first-expire-first-out (FEFO) system.
- Serial Numbers (IMEI): For electronics like smartphones or tablets, the International Mobile Equipment Identity (IMEI) serves as a unique identifier for each device. Recording the IMEI as a serial number in your inventory system helps in tracking individual units through their lifecycle, aids in warranty management, and is useful in case of theft or loss.
- Cost Prices: Keeping track of the cost price of each inventory item is essential for accurate profit analysis and pricing strategies. By recording this variable, you can monitor fluctuations in supplier pricing, manage your markup effectively, and understand the financial impact of inventory changes on your overall business performance."
These examples demonstrate how different variables can be utilized to enhance inventory management on the Afosto platform, ensuring each item’s specifics are effectively recorded and utilized for efficient business operations.
FAQs
1. What are the available units?
Every product added to the system starts with a default unit called "Pieces", which consists of one piece. Additional units can be added based on packaging requirements, such as boxes, crates, or pallets, each containing multiple pieces. These units allow for efficient stock management, ordering, and tracking.
2. What is a ‘standard purchasing unit’?
The standard purchasing unit is the default measurement used in replenishment lists for a specific product. Therefore, when creating a replenishment list, this standard unit is employed, whether it be crates, boxes, or any other unit of measure.
3. Can units be edited or deleted after they have been added to a product?
- The default "Pieces" (1 piece) unit cannot be edited or deleted unless an additional unit has been added.
- Once a second unit is added, you can modify or remove units as needed, provided that at least one unit with a quantity of 1 remains in the system.
- If a product has transactions associated with a unit, restrictions may apply to prevent inconsistencies in inventory records.
4. Is there a way to update or change units/conversion rates once they are set?
- Yes, but only if at least one unit with a quantity of 1 remains in the system.
- The system allows you to edit or update additional units and their conversion rates, ensuring flexibility in inventory tracking.
Overview
In this overview, you now see a chart with information about your inventory. As you can see, the stock is too low, and reordering will be necessary to replenish the safety stock. All of this could be automated. If you have any questions about this, feel free to send an email to [email protected].
- How to add stock
- Choose warehouse
- Specify company
- Stock position
- Specify Quantity
- Adding Position Settings
- Warehouse Settings
- Pre-order deadline
- Product Units
- Key Benefits of Using Units
- How to Add Product Units
- Stock Variables
- Setting Stock Variables at the Account Level
- Overriding Stock Variables at the Product Level
- Examples
- FAQs
- Overview