Inbound processing
At its core, receiving processing (ontvangstverwerking) is the process of checking goods into your inventory. This process is based on two primary scenarios:
-
Known Receipt: You know exactly what is arriving.
-
Unknown Receipt: You do not know what is arriving.
Scenarios
Known Receipt You have placed an order with your supplier and received lists of products scheduled for delivery at specific times. These lists are easily identifiable and ideally include barcodes. In Afosto, we refer to these as Receiving Lists.
Unknown Receipt You are unaware of exactly what is arriving. This scenario often applies if you place multiple orders per day with a supplier who then delivers them to you in unscheduled batches. Afosto’s receiving process is designed to handle both scenarios seamlessly.
Processing Options
Once goods arrive, you have two primary options:
-
Put-away: Storing items in your warehouse as stock.
-
Cross-docking: Moving items directly to outgoing orders.
Put-away (To Stock) When putting items away in your warehouse, products are booked directly into your inventory the moment they are scanned.
Cross-docking With cross-docking, an additional check occurs during processing: the system scans for open orders that contain the product. By default, the product is assigned to the oldest order. However, this logic can be customized. Please contact us for more information regarding custom configurations.
How-to
Below is an instructional overview of the steps involved in a typical receiving process.
Where to start?
You can initiate a receiving process in two places:
-
The WMS App
-
The Platform
Options
When creating a new session, you will always be presented with the following choices:
Choice 1: Receipt Type
-
With or without a receiving list: (i.e., whether or not you know what is arriving).
-
If you know what is arriving and select that option, you must then select the specific lists you wish to process.
Choice 2: Processing Method
-
Next, choose whether to put the products directly into stock or to cross-dock them.
-
Note: With the cross-dock option, you can still place items into stock, but the system will always prioritize checking for outstanding orders first.
The Process
After making your selections, you will enter a screen where you can scan incoming items. The basic workflow is as follows:
-
Scan the product.
-
View the required action for that product.
-
Repeat until all products have been processed.
Cross-docking Workflow
In the case of cross-docking, the steps are:
-
Scan the barcode.
-
Check for orders: The system shows if there is a known outgoing order for this item.
-
Assign a location: Choose or scan the location where you want to place the product.
-
For the first product of a specific outgoing order, you can freely choose any location.
-
For subsequent products belonging to the same order, you must place them in the same location as the previous items.
-
This allows you to sort items until the orders are complete or your pickwall is full.
-
Scan the next product.
By repeating this process, you sort all incoming products. Outgoing orders are consolidated at the assigned locations. Once all products for a single order are gathered at the same location, the order is automatically released, making it ready for shipment.
Pickwall
The most efficient way to sort products into outgoing orders during receiving is by using a so-called pickwall or putwall. Simply put, it works as follows:
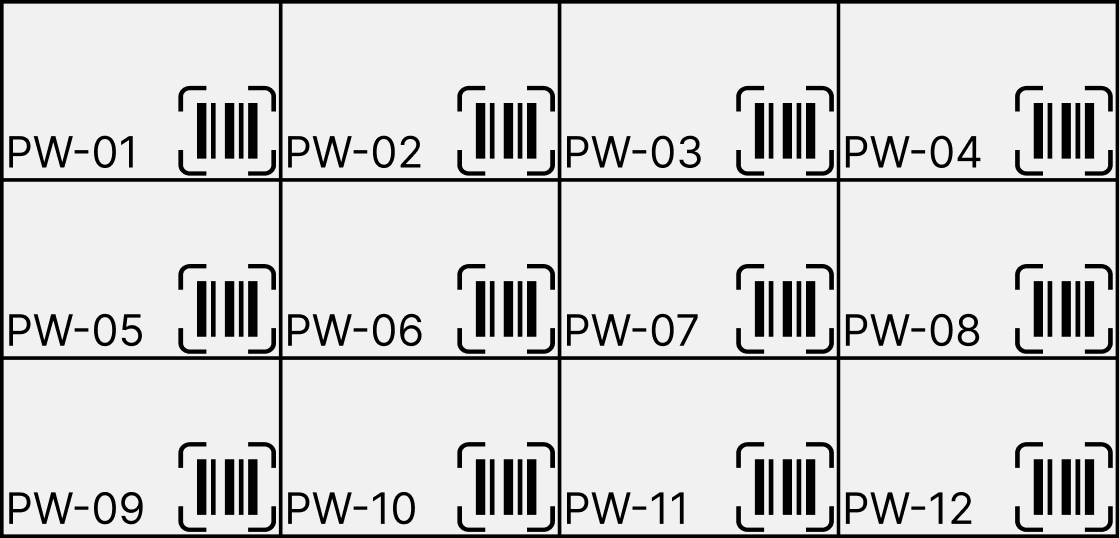
A wall or shelving unit consisting of compartments, each assigned a specific location number or code. Adding a barcode to each compartment significantly speeds up the process, as it allows you to scan the location instead of typing it manually.
The example below shows a schematic representation of what a pickwall might look like. In this instance, we have 12 compartments labeled PW-01 through PW-12. Each compartment is equipped with a barcode; when scanned, it automatically enters the corresponding value (PW-01 to PW-12) as the position on your scanner.
Example Scenario
Suppose you have the following open orders:
Order 1:
-
SKU 1234
-
SKU XYZ
Order 2:
-
SKU ABC
-
SKU 4567
You receive the following products from your supplier: SKU 1234, SKU XYZ, SKU ABC, and SKU 4567. You open the receiving process and scan:
-
SKU 1234: This item belongs to Order 1. Since it is the first product scanned for this order, you are free to choose a location. You choose and scan PW-01.
-
SKU ABC: This item belongs to Order 2. It is the first product scanned for this order, so you are free to choose a location. You choose and scan PW-02.
-
SKU XYZ: This item belongs to Order 1. It is the second product scanned. The system indicates that the first item for Order 1 is located in PW-01. You must place SKU XYZ in PW-01 as well and confirm this by scanning the location again.
-
SKU 4567: This item belongs to Order 2. It is the second product scanned. The system indicates that the first item for Order 2 is in PW-02. You must place SKU 4567 in PW-02 and confirm this by scanning the location.
Order 1 and Order 2 are now both complete and ready for shipment. They can be found in locations PW-01 and PW-02, respectively.
The orders will now reappear in your shipping overview, with the positions PW-01 and PW-02 clearly indicated next to the corresponding orders.